
Voyage Control: Delivery
User Guidance & FAQ's
-
You will receive an email from the project team with an invitation to join the project. If you do not complete the registration within 7 days of receiving the initial invite, the invite will expire. In this case, you will need to request a new invite from the project team.
-
The link in the email will take you directly to the sign-up page, with your email address prepopulated.
-
On the sign-up page, you will be prompted to create a password and complete a form with your personal information.
-
The next step is to create or join your organization. If we recognise your email domain you will be asked to join a suggested organization. If we don't recognise it you will need to create the organization.
-
Once you have filled out all the required information, complete the registration process and proceed to the login page.
To login to Voyage Control Delivery, visit delivery.voyagecontrol.com and enter your registered email address and password. You must have received an invite from the project team to join Voyage Control and completed the registration before you are able to log in.
If you encounter any issues with logging in due to a forgotten password, see the ‘Forgot Password’ support section to assist you in resetting your password.
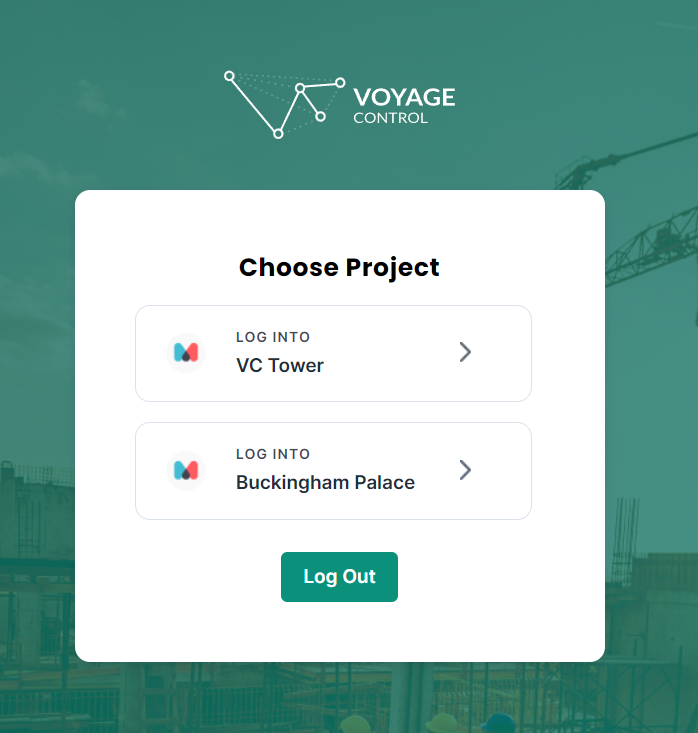
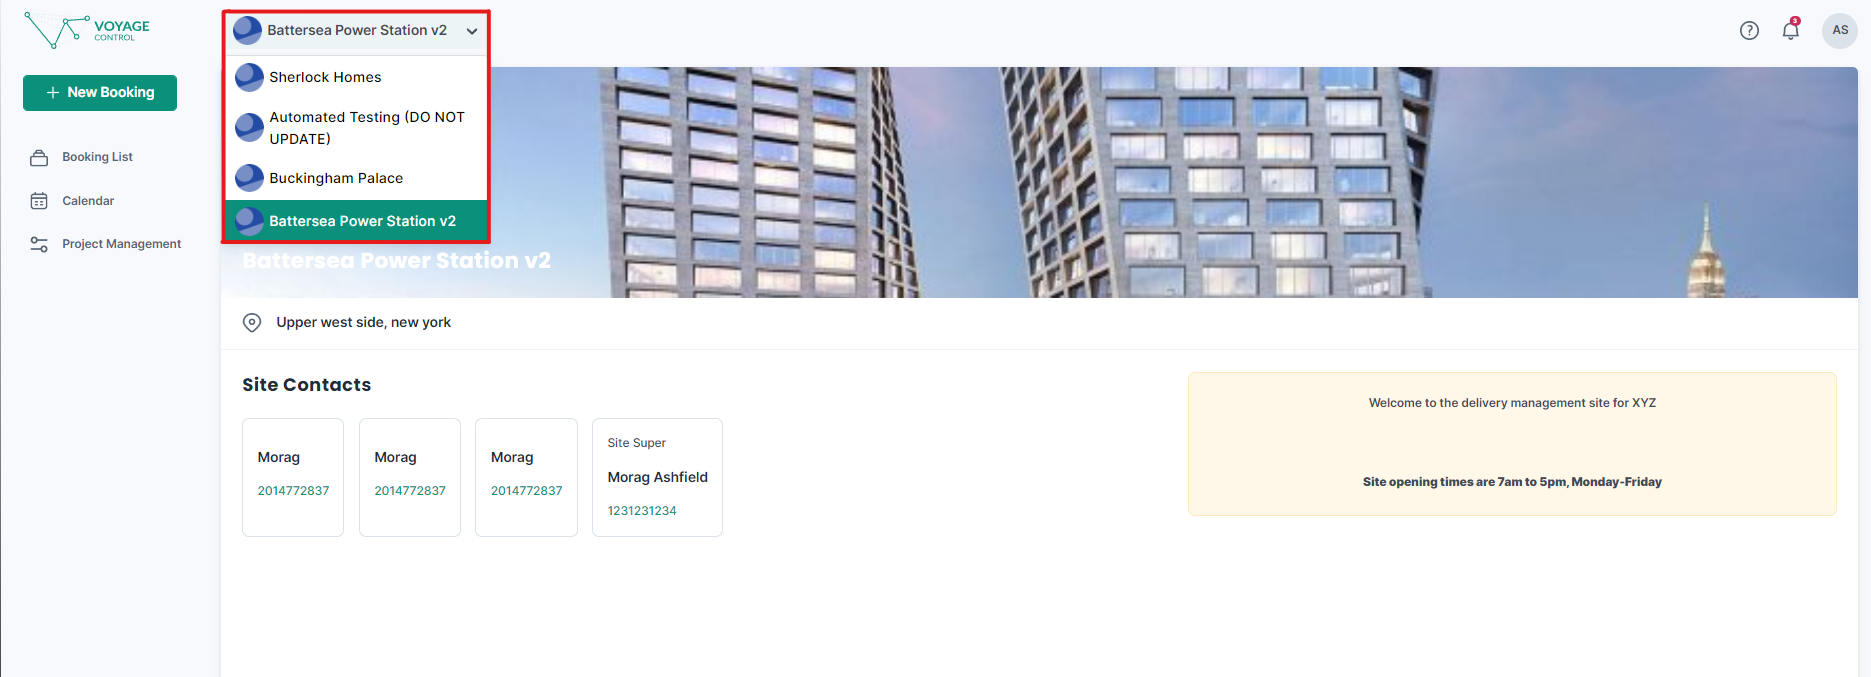
Once in a project, you can switch between projects using the project switcher, located in the top menu bar of the project site.
This project switcher is a convenient tool to allow you to easily move between different projects without having to navigate back to the main project list. Simply click on the project name to select the project you want to switch to.
If you have forgotten your password or are having trouble logging in, follow these steps to reset your password.
-
First, go to the login page in your web browser Voyage Control.
-
Once you're on the login page, click the "forgot password" button.
-
You will need to enter the email address that you used to register on Voyage Control. Make sure to enter the correct email address and then submit the form.
-
Next, you'll need to wait for the reset password email to arrive in your inbox. This is usually instant, but can take up to 10 minutes. Remember to check your spam folder, as is can sometimes end up in there. Once you receive the email, click on the link provided in the message. This will take you to the reset password page.
-
On the reset password page, you will be prompted to enter your new password. Make sure to choose a strong password that you can remember. The minimum requirements for a password are show on the screen.
-
Re-enter your new password to confirm it and hit submit.
-
You can now log in using your email address and your new password.

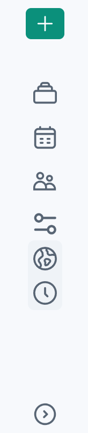
- Clicking the Voyage Control logo sends you to the project’s home page.
- The project selector is where you can see all of the projects you are associated with and how you can switch between those projects.
- The help centre icon takes you to the support page, which is where you are now. If you ever need to get back here, just click the question mark.
- The bell button shows you your most recent notifications and clicking ‘Show All’ takes you to the Alert Center. For help with the Alert Center see the Alert Center help page
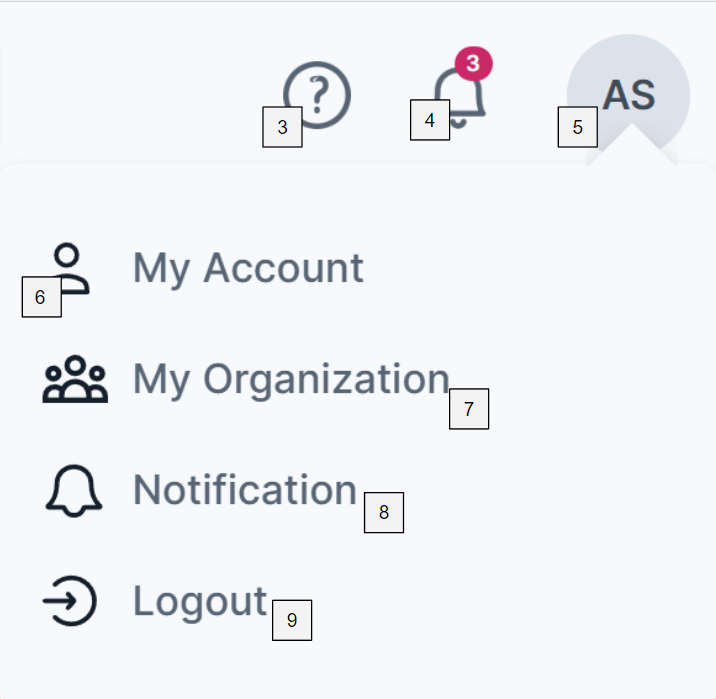
6. ‘My Account’ is where you can view and update your user details. More information on the My account section can be found in the My Account area of this support page
7. ‘My Organization’ takes you to your organization page, where, as someone with the organization role of user, you can view your organization's details. If you have the organization admin role you can also update your organization’s detail. More information on the My Organization area can be found in the My Organization section of this support page.
8. 'Notification preferences' is where you can change which notifications you receive. More information on the Notification Preferences area can be found in the Notification Preferences section of this support page.
9. The logout button signs you out of your account and returns you to the login page.
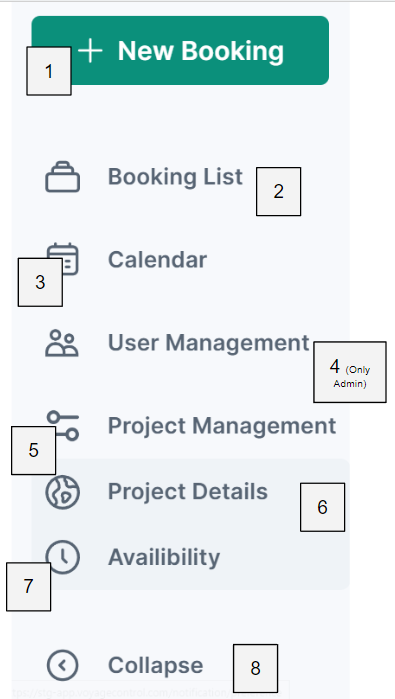
- The ‘New Booking’ is where you go to create a booking. For more info on creating bookings see the creating bookings support section.
- The ‘Booking List’ shows you all your upcoming bookings and historical bookings. For users with the project role manager, admin or owner, you’ll be able to see all bookings for the current project. For more info on the booking list area see the View Bookings support section.
- The ‘Calendar’ is where all your bookings will be displayed on a calendar. For more info on the calendar see the Calendar support section.
- The ‘User Management’ area is where you can invite and manage the users on the project. This area is only visible and accessible to those users with the project role manager, admin or owner.
- The ‘Project Management’ area is where you can setup your project constraints. This area is only visible and accessible to those users with the project role manager, admin or owner. This area is split into ‘Project Details’ and ‘Availability’.
- The ‘Project Details’ area is where you can input all the information about your site, including access points and resources.
- The ‘Availability’ area is where you set the projects operational hours and various other constraints that define when a person can make a booking.
- When viewing on a small screen, clicking collapse with minimise the left menu bar to give you a better view of the main screen.
See the Roles and Permissions section for more information about the areas available to you.
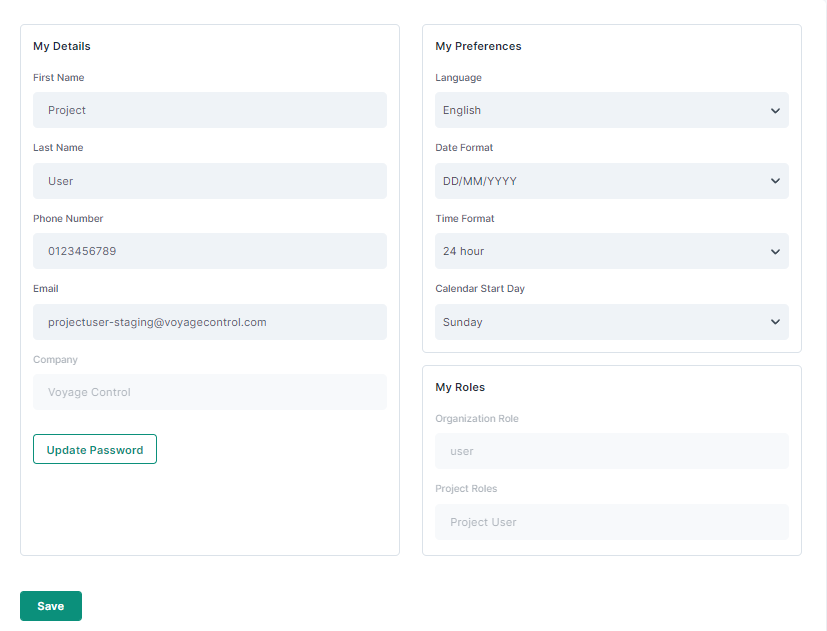
The ‘My Account’ is where you can view and update your details. The page can be accessed through the top navigation bar after clicking your profile picture.
The page is split into three sections, these sections are:
-
My Details,
-
My Preferences, and
-
My Roles.
My Details
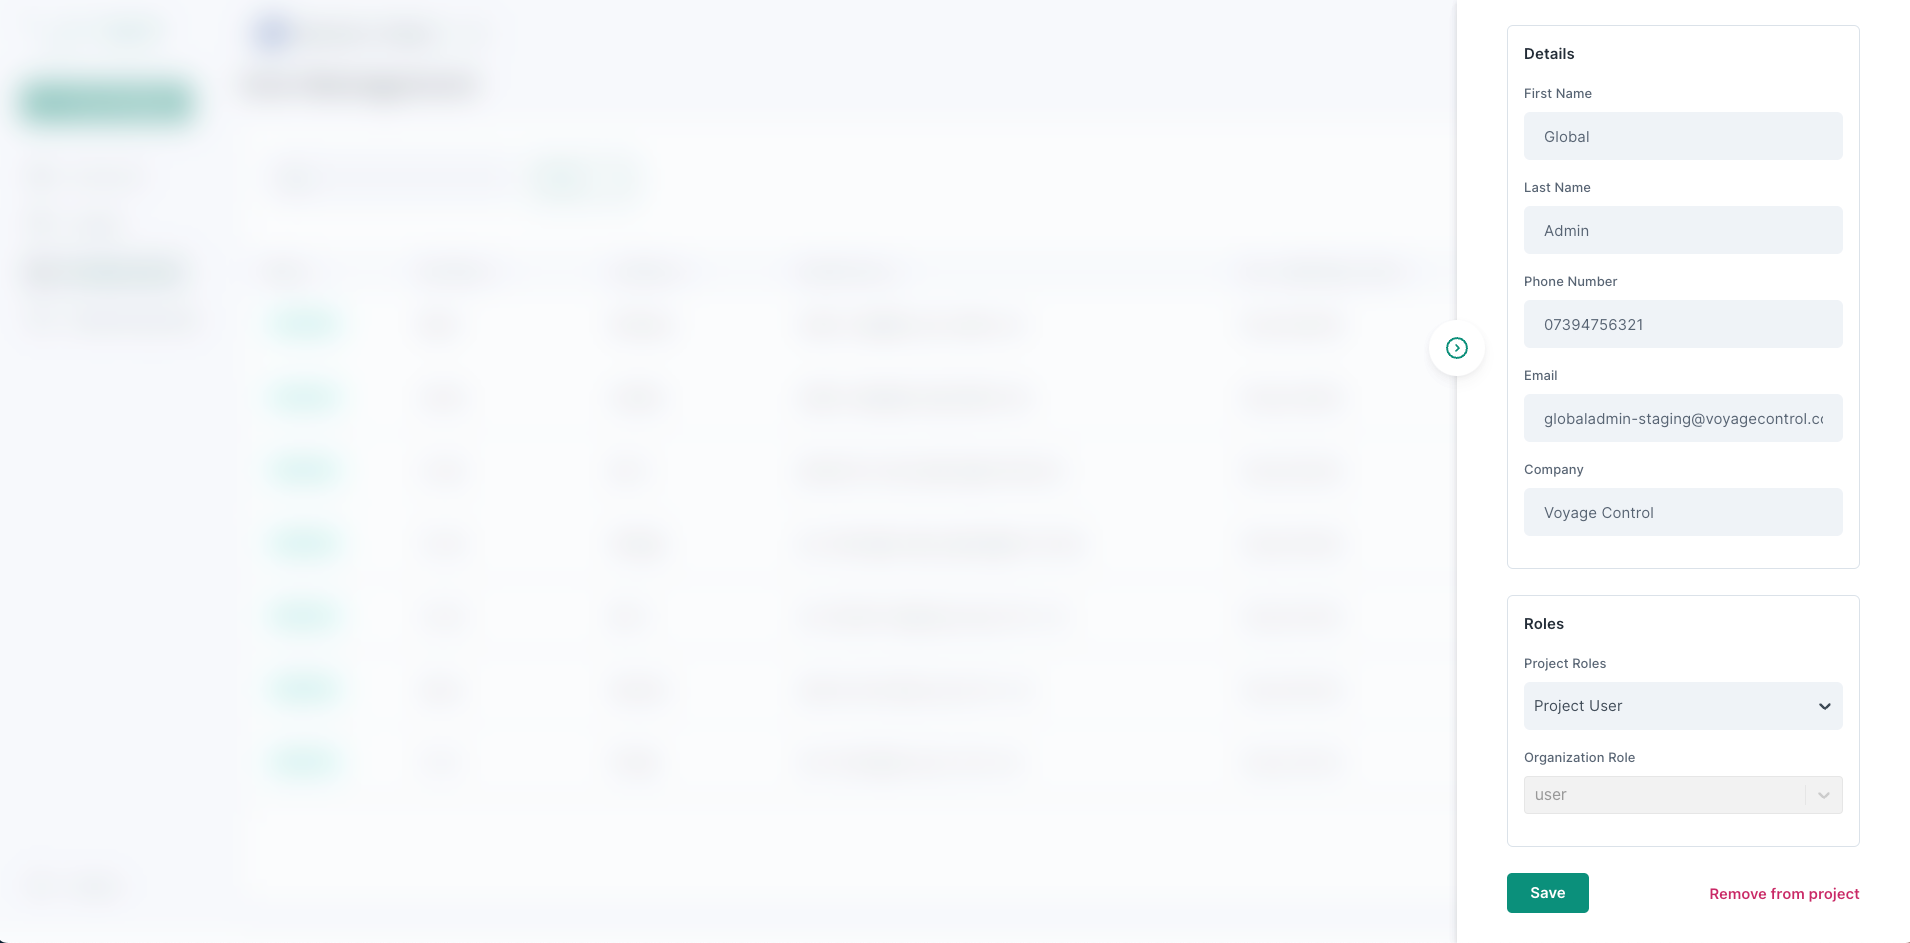
The Main section of the page, this section is used to update your personal details, which consist of; your first name, last name, email address, and phone number. From here, you also have the option to update your password. The company you are associated with can be viewed here. If you believe the company you are associated with is incorrect you should reach out to support@voyagecontrol.com for assistance.
Reminder
Make sure when you are done updating the details that you hit the save button at the bottom of the page to confirm all the changes made.
My Preferences
This section is where you can specify your preferences for viewing the project. You can set the following preferences;
-
Language - we currently only support English, but we plan to roll out more languages soon
-
Date Format - we support both DD/MM/YY and MM/DD/YY formats
-
Time Format - we support 12hr and 24hr time formats
-
Calendar Start Day - you can specify that the week view on the calendar starts on Monday or Sunday
My Roles
This section is where you can view your current project and organization roles. This section is view only, if you wish to update your project role it can be done from the User Management area, this is only accessible to those with the project role manager, admin or owner. If you wish to update your organization role, it can be done from the My Organization area. However, roles can only be updated by those with the organizational role Admin. If you have not been assigned one of these roles you must contact someone who has. See the Roles and Permissions section for more information.
Details
The organization details consists of the following information;
-
Organization’s name,
-
Organization’s address, and
-
Organization’s logo.
All users that are part of the organization can view this information, however, only those with the organization role 'admin' can update this information. See the Roles and Permissions section for more information.
Users
This area is where you can view the details for all users associated with your organization. If you have the organization role 'admin', you are also able to update a users organization role and if necessary remove them from the organization.
To get started, you can access your notification preferences by clicking on your profile picture in the top menu bar and selecting the "Notification preferences" page.
Once you're on the notification preferences page, you'll see a list of all the notification types you can receive. These notifications relate to various booking actions including; Approval, check-in, cancel, edit and move.
For each notification type, you can toggle whether you want to receive that notification type or not, and through what method you wish you receive it.
All users can set their preferences for notifications about the bookings they make themselves. However, some user roles allow you to receive notifications about bookings made by others.
If you are assigned the organization admin role, you can additionally set your preferences for receiving notifications about bookings made by others in your organization.
If you are assigned the project manager, admin or owner role, you can additionally set your preferences for receiving notifications about bookings made by all users associated with your project.
See the Roles and Permissions section for more information.
Reminder
Once you've updated your notification preferences, make sure to save your changes by clicking save at the bottom of the page. This will ensure that your preferences are applied to your account and that you'll receive the notifications you want.
All users are assigned two types of user roles when joining the platform, a ‘Project Role’ and an ‘Organization Role’. ‘Project Roles’ set the user's level of access and permission to undertake specific actions within the context of the project to which they are assigned. ‘Organization Roles’ set the user's level of access and permission to take specific actions within the context of their organization.
Below sets out the access and permissions granted to users with each role and level. Note that a user's organization role permissions are in addition to their project role permissions.


The main feature of the Voyage Control site is the booking system. It starts with the booking creation process, where you have the ability to create four types of bookings: delivery, recurring, multi-vehicle, and resources only.
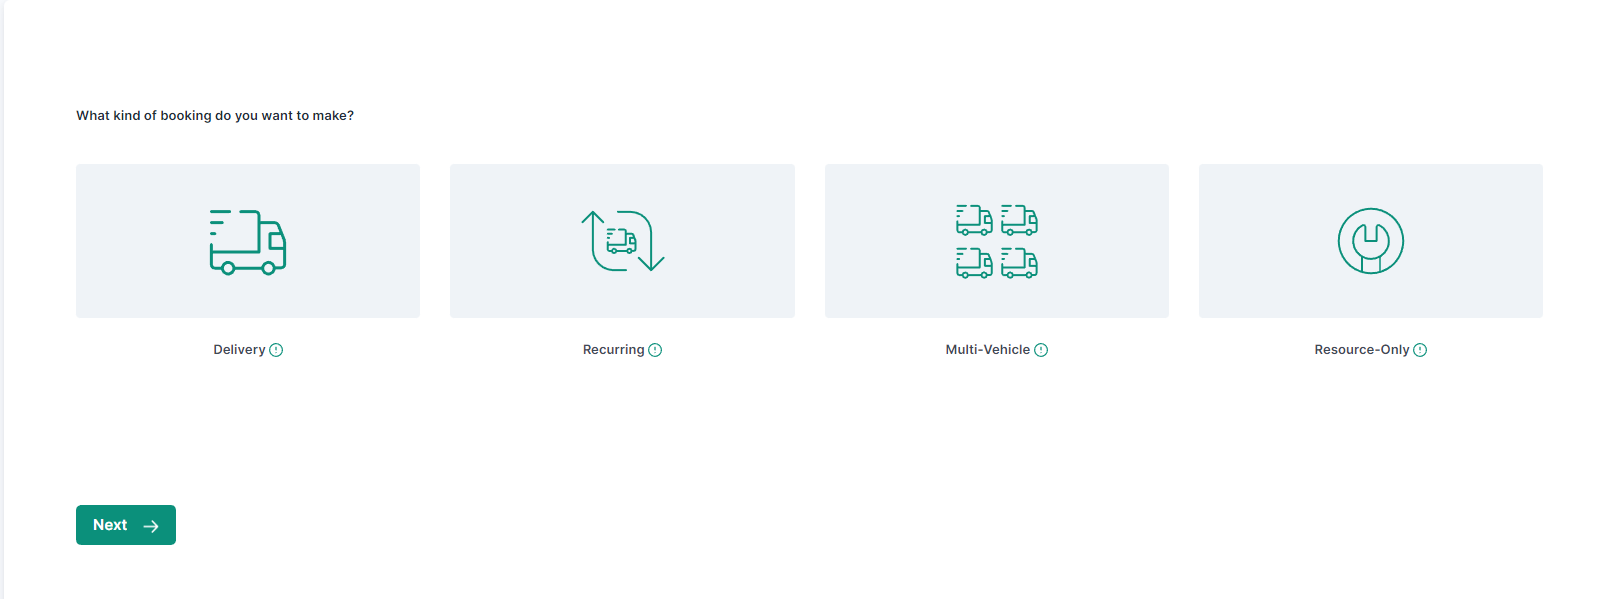
Delivery Bookings
Delivery bookings are the standard booking type on the Voyage Control site. With this type of booking, one vehicle delivers an order to the project site through an access point. Optionally, a resource, such as a tower crane or forklift can be added to the booking if available at the site. This type of booking is ideal for a one-time delivery of goods or supplies to a site.
Recurring Bookings
Recurring bookings are similar to standard deliveries, but with the added convenience of being able to book multiple deliveries at an interval of your choosing, either monthly or weekly. This type of booking is perfect for those making regular deliveries or collections for a site.
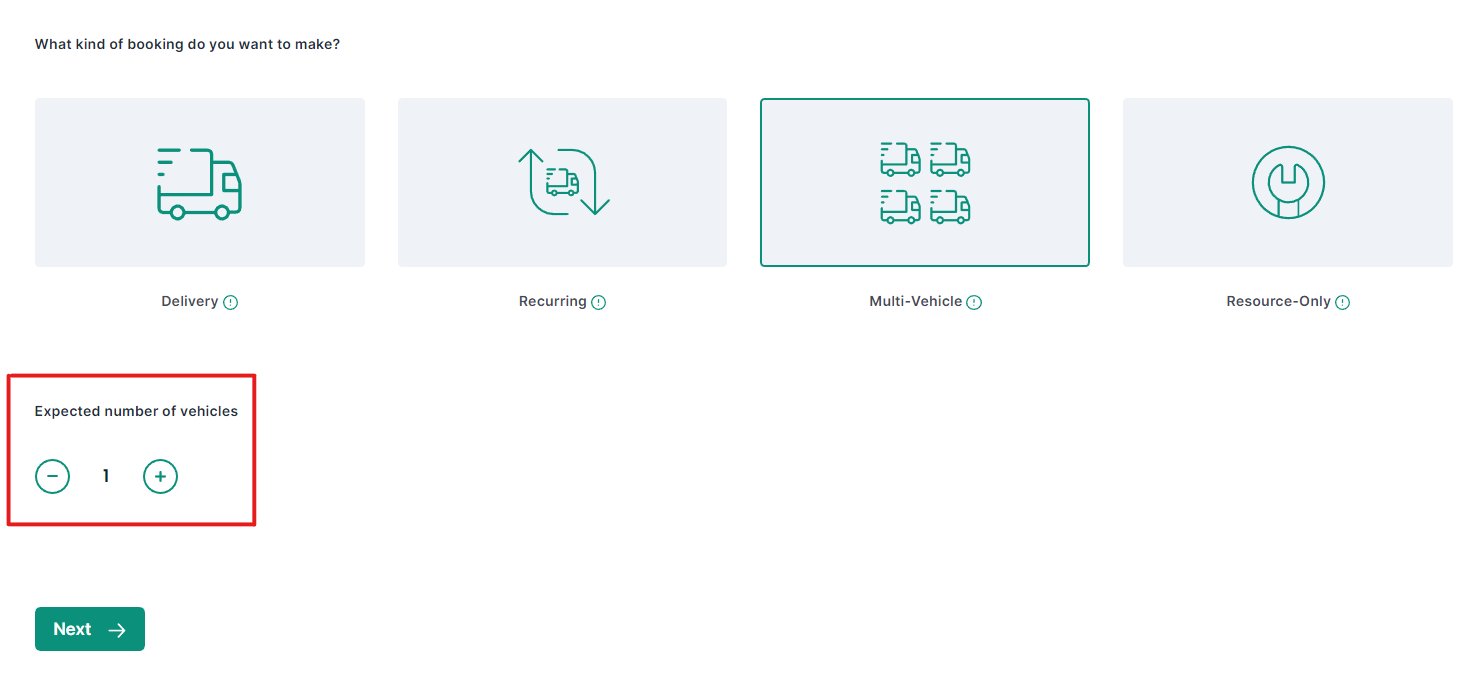
Multi-Vehicle Bookings
Multi-vehicle bookings are similar to standard delivery bookings but with multiple vehicles arriving to site. This type of booking is ideal for larger deliveries that require more than one vehicle to complete the delivery. For example, a concrete convoy.
When selecting a multi-vehicle booking, make sure you select how many vehicles will be arriving at the site before clicking through to the next page of the booking process.
When selecting a duration at a later stage in the booking process ensure you account for all the vehicles.
Resource Only Bookings
Resource only bookings are not deliveries arriving at the site, but bookings for the site's resources. This creation process doesn't require the selection of an access point or a vehicle. This type of booking is perfect for booking resources such as tower cranes, forklifts or other equipment available at the project site.
How to Make a Booking
Start by selecting the type of booking you would like to place - delivery, recurring, multi-vehicle, or resource only. Once you've made your selection, you'll be taken to the first page of the booking process.
On the first page of the booking process, you'll need to select the vehicle type that will be used for the delivery, as well as the access point where the vehicle will be delivered. If you need to reserve resources, you can do so by selecting from the available list. Additionally, if you're booking a resource-only, just select the resource you would like to reserve.
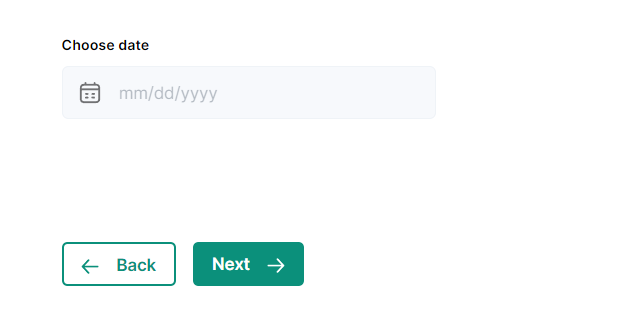
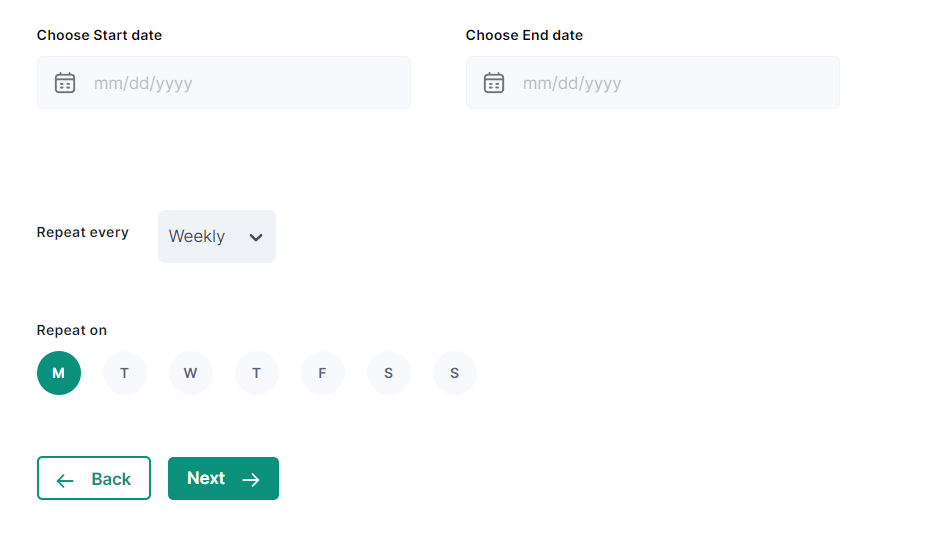
Next, select the date the delivery will take place by clicking on the input field and selecting the date from the calendar. If you're making a recurring booking, select the start and end dates for your multiple bookings, choose between weekly or monthly bookings, and then select the days the bookings will take place.
Standard booking
Recurring booking
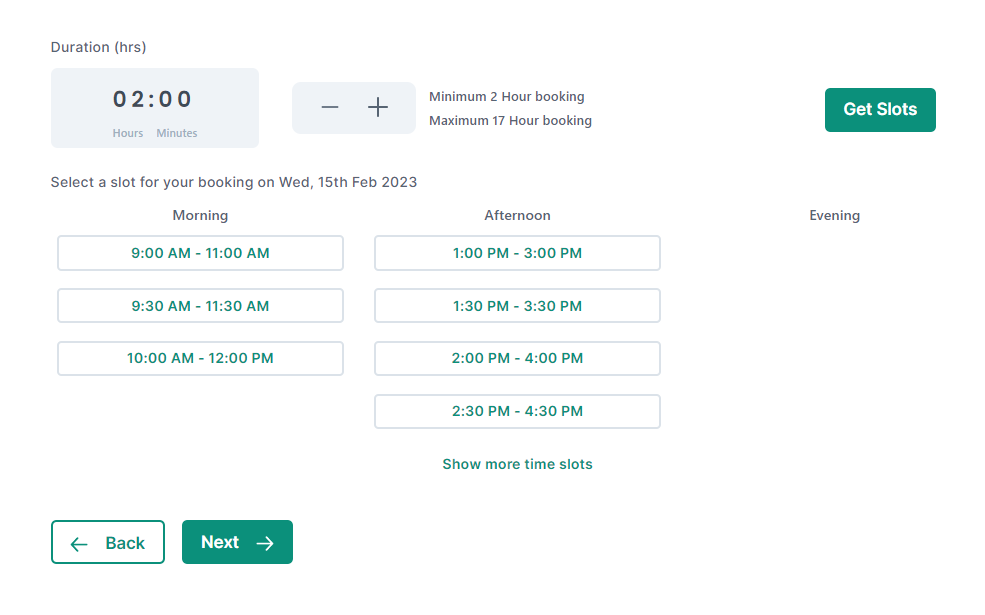
After selecting the date, choose the delivery time by selecting the duration of the delivery and then hitting the "get slot" button to see all available time slots for that date. Select your desired time slot and hit "Next."
On the last page of the booking process, you will be asked to provide any additional details, such as special forms that the project team requires you to fill out. Some forms may be mandatory, so make sure to identify those with an asterisk (*) next to the questions. Note that not all projects require the same forms, and some may not require any additional details at all.
Finally, review your booking details and click "Submit Booking" to place your delivery.
After creating your bookings, you can view them on the booking list page, which is located on the sidebar. The booking list provides a compact view of your bookings, with concise information that includes the date of the booking, the arrival and departure time, the access point, the recipient's organization name, and if applicable, the resource reserved. Note that some users will be able to see other bookings depending on their permissions and roles. As a project and organization user, you can only see your own bookings. If you are an organization admin, you can see all bookings created by users in your organization. Finally, if you are a site admin or manager, you can see all bookings placed on the platform.
There are four different ways to find a specific booking on the booking list:
-
Use a date range: Click on the calendar icon to select a date range for the bookings you want to view. This can help you narrow down your search to a specific time period.
-
Use filters: Click on the "Filter" button to bring up a list of filter options. You can filter bookings by booking type, access point, vehicle type, resource, and the organization of the booking creator.
-
Use the search function: Type in your search term in the search box located at the top of the booking list page. You can search by booking ID, booking creator's personal details (name, phone number, email address), booking type, access point, vehicle type, resource, and organization.
-
Use the quick filter feature: You can also use the quick filter feature located just above the booking list to filter bookings by the status of the delivery.
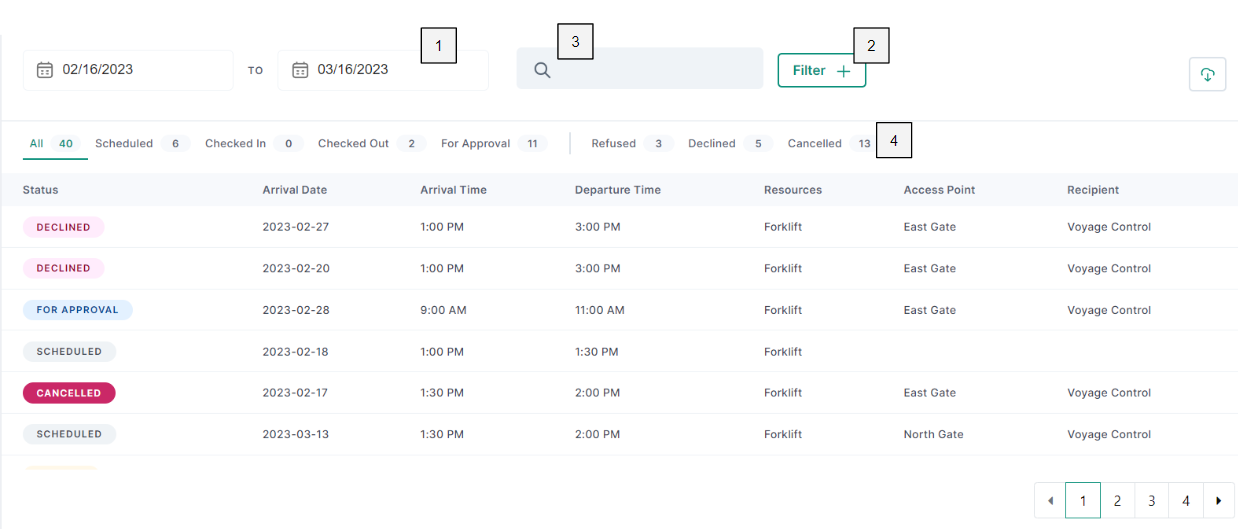
If you want to export the booking list, simply click on the "Download" button located at the top right corner of the page. An Excel sheet will be generated, which you can download to your computer.
Editing or Moving My Booking
-
Editing the details of a booking
-
Moving to a different time slot
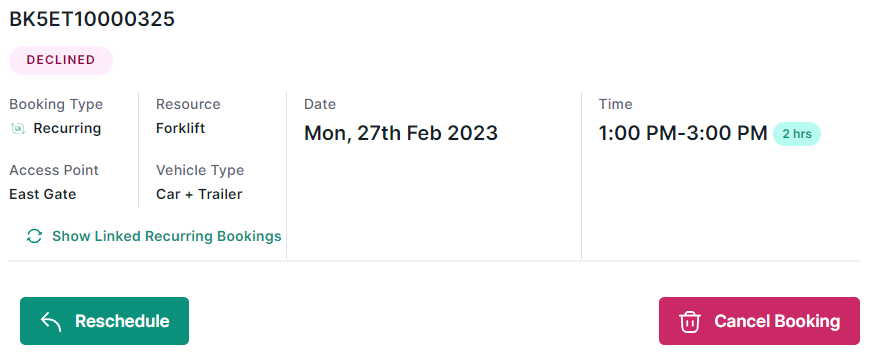
Rescheduling a Declined or Refused Booking
- Review booking details and pick a new time slot
Booking Details
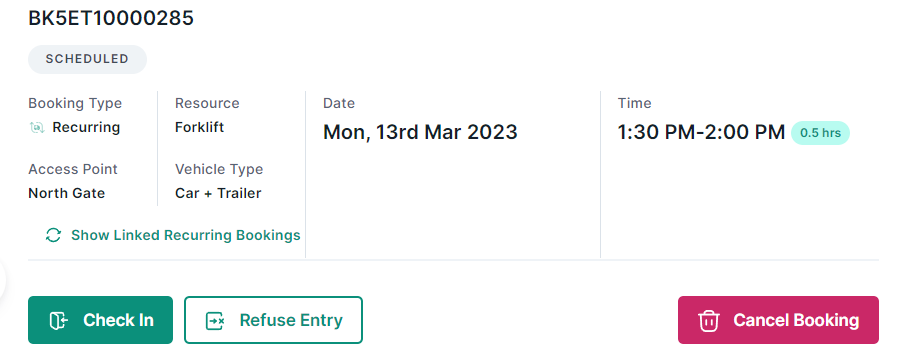
To access more information about a booking or make changes to it, simply click on the desired booking in the booking list. This will bring up a pop-up window displaying the booking's details. The booking detail page provides all the information associated with the booking, including the date and time slot, access point, recipient's personal details, booking type, booking status, the reserved resource, and any additional information gathered during the booking process.
During the delivery process, you can make updates to the booking using a variety of actions, such as:
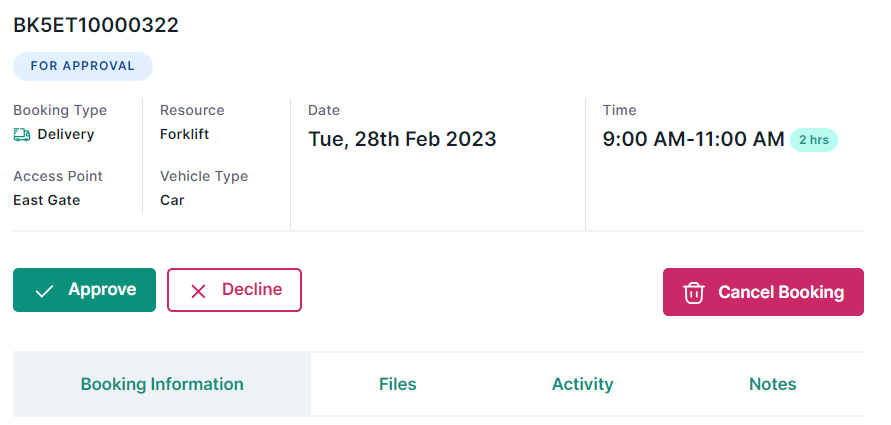
Approving/ Declining Bookings
Once a booking is created, its status will be set to "For Approval". This means that a project admin or manager needs to approve the booking before any further action can be taken. If the booking is declined, you will need to reschedule it and wait for approval again. Once approved, the booking status will change to "scheduled". To approve or decline a booking that's in the "For Approval" status, simply click on the appropriate button.

Important note
Please refer to the table below to determine which roles are authorized to perform specific actions, as not all actions can be done by all users.

You can also move bookings and edit booking information directly from your booking list. To access these options, simply click on the three vertically stacked dots located in the top-right corner of the booking details page, apart from the actions mentioned earlier.
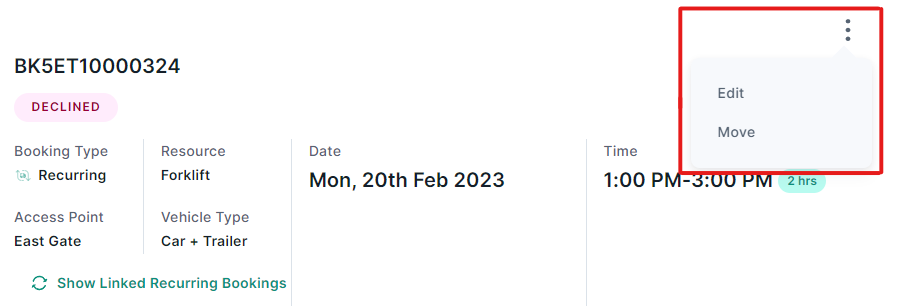
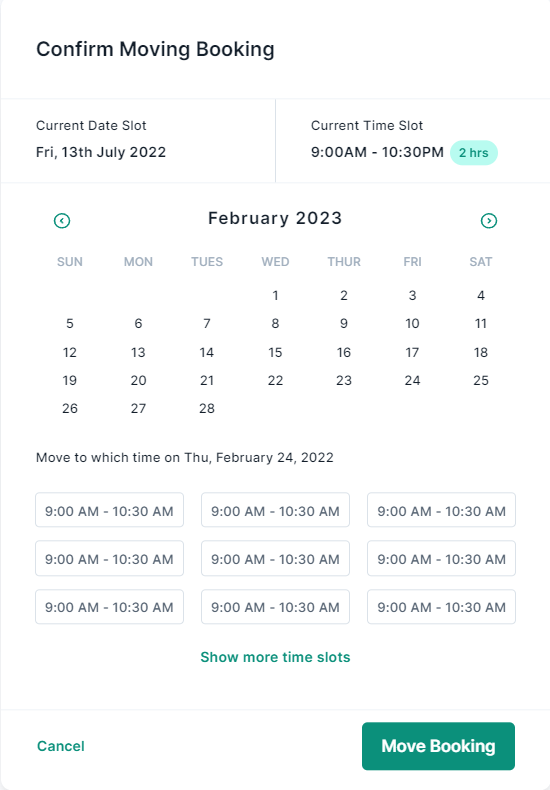
Moving Bookings
To move a booking, you'll need to click on the 'Move' button. This should bring up a pop-up window with a form to move the booking.
In the pop-up window, you should see your current date and time slot at the top of the page. Below that, you'll see a calendar where you can choose which date you'd like to move the booking to. Once you've selected the date, a list of available time slots will be generated. Choose the time slot you'd like to move the booking to from the list.
After you've selected the new date and time slot, double-check that the information is correct. If everything looks good, click the 'Move Booking' button to save the changes.
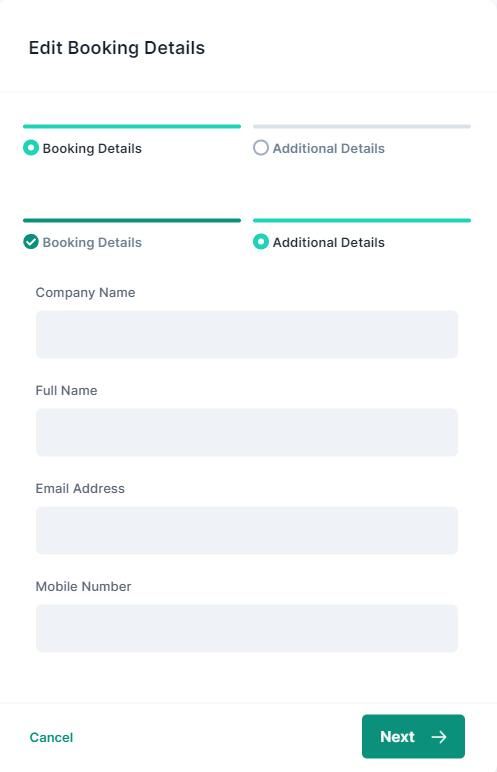
Edit Bookings
The form is divided into two sections. The first section focuses on recipient details, such as the company name, full name, email address, and phone number. Once you've updated these fields, click 'Next' to proceed to the next section.
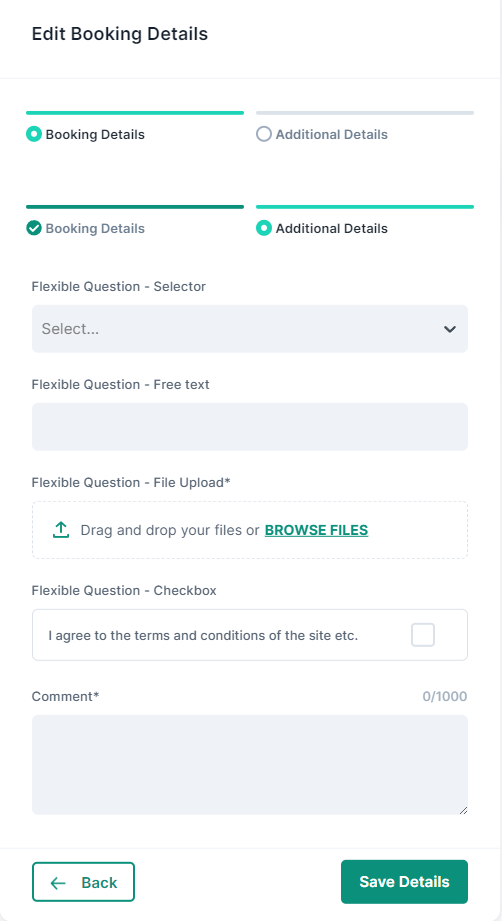
The next section includes all the additional questions that were asked during the booking process as well as the comment section. You can make any necessary changes to these fields on this page.
Once you've made all the necessary modifications, take a moment to review the updated details to ensure everything is correct. Then, click the 'Save Details' button to save the changes.
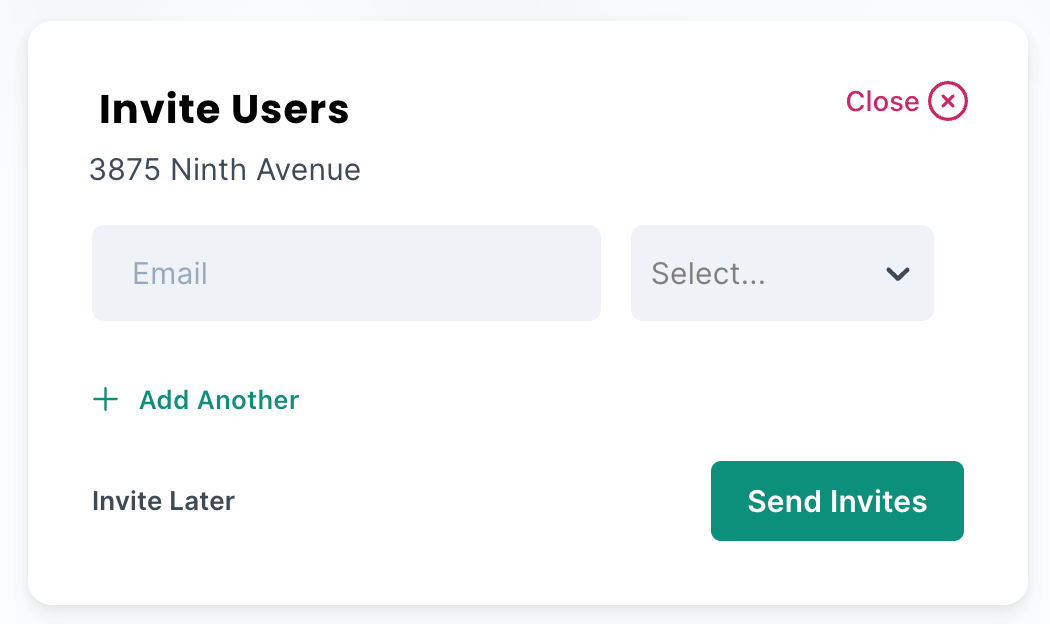
To invite a user to the project you must have either the ‘Manager’, ‘Admin’, or ‘Owner’ project role. You can invite users from the ‘User Management’ area.
-
Click invite user,
-
Enter the company email address of the user you want to invite,
-
Select the user role you want to assign the new user,
-
If you want to invite multiple users, click add another,
-
Click ‘Send Invites’.
To update a user's project role you must have either the ‘Manager’, ‘Admin’, or ‘Owner’ project role. You can update a user's project role from the ‘User Management’ area.
-
Locate the user you wish to change the project role for,
-
Select a new project role from the menu.
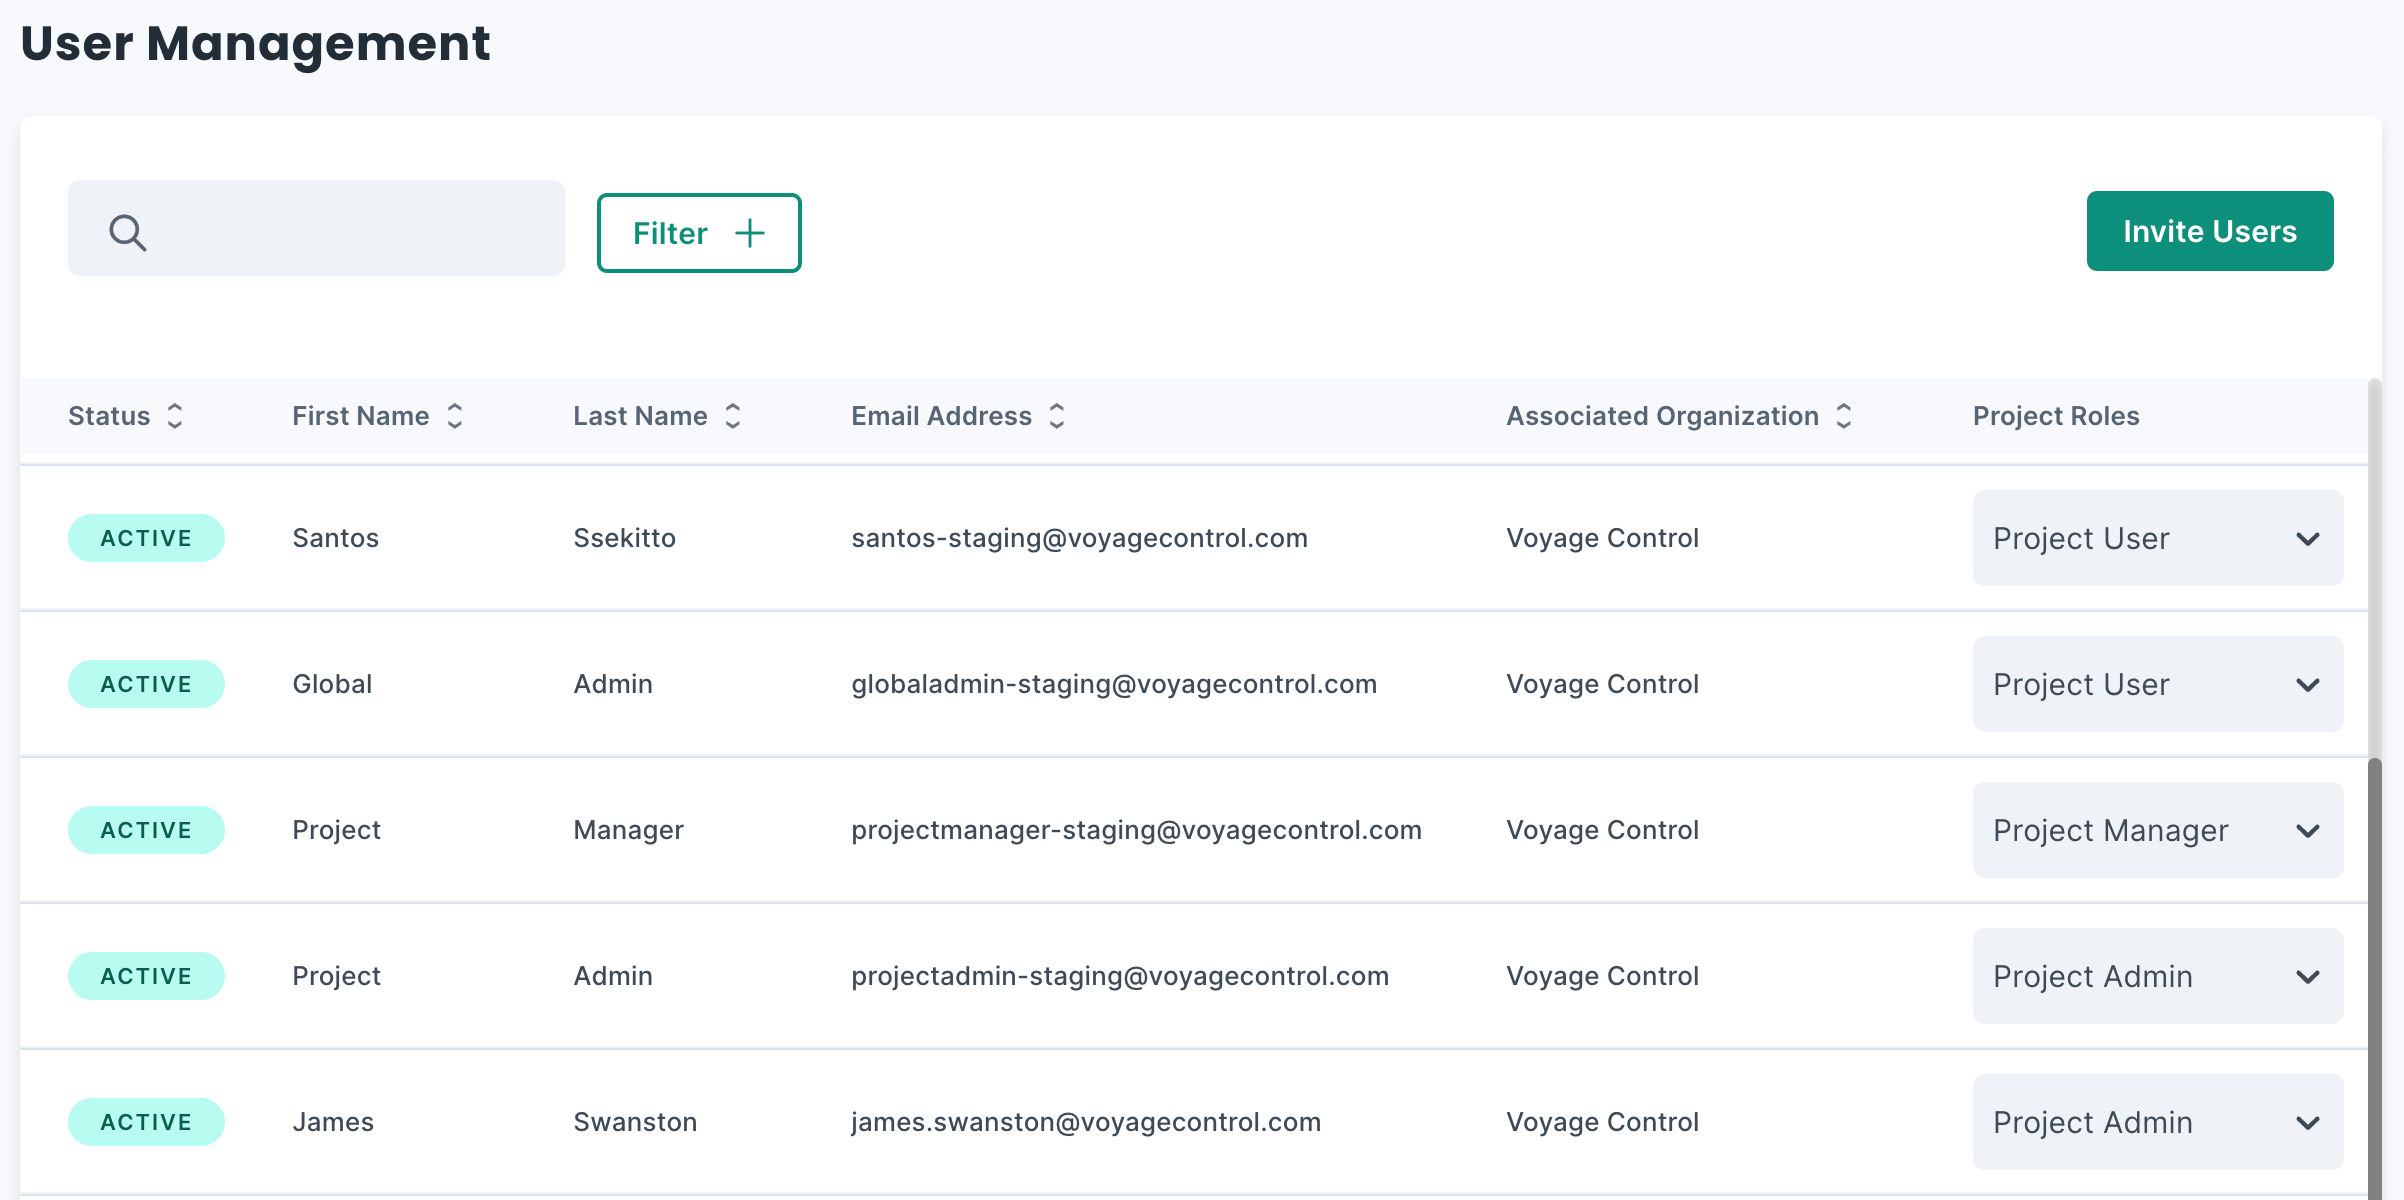
To remove a user from the project you must have either the ’Manager', ‘Admin’, or ‘Owner’ project role. You can remove a user from the project from the ‘User Management’ area.
-
Locate the user you wish to remove,
-
Select the user to open the user details,
-
Select ‘remove from project’ and confirm.
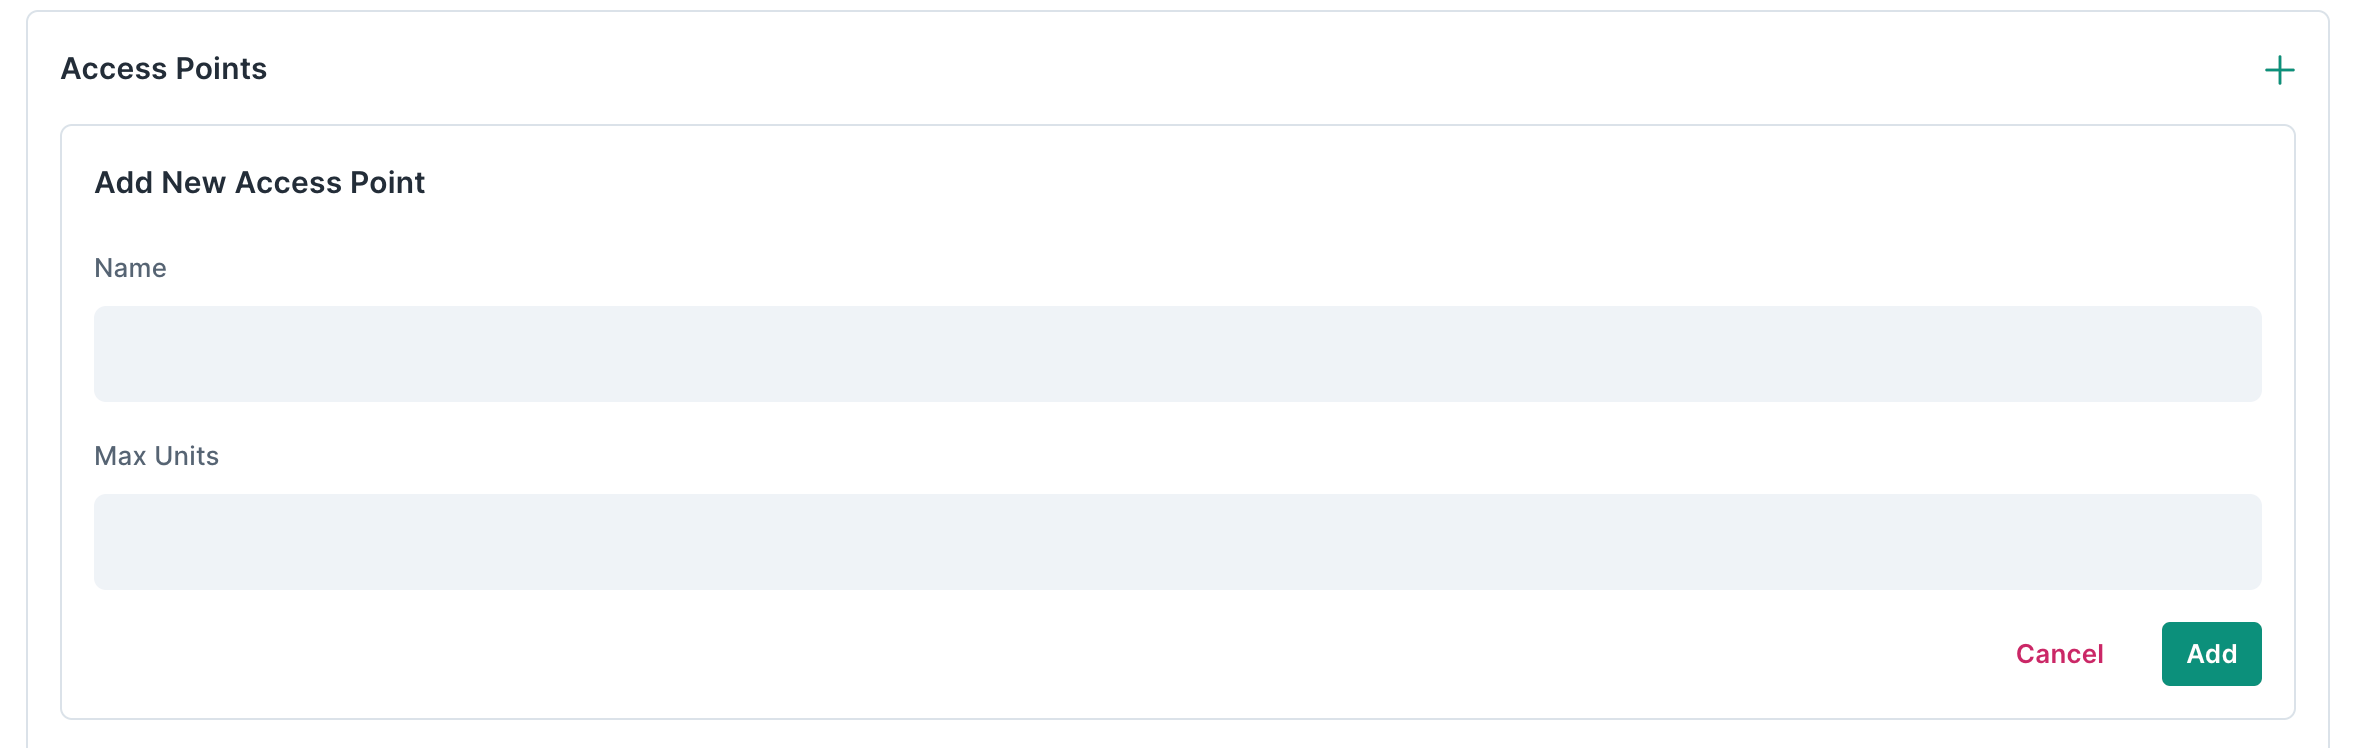
To add an access point you must have either the ‘Admin’ or ‘Owner’ project role. Access points can be added from the Project Details area.
-
Go to Project Management > Project Details,
-
Navigate to the Access Points tab,
-
Click the plus button in the top left corner,
-
Name your new access point,
-
Add a maximum number of units, this is the maximum number of bookings that can be made in a single 30-minute time slot,
-
Click save.
To edit the name or capacity of an access point you must have either the ‘Admin’ or ‘Owner’ project role. Access points can be edited from the Project Details area.
-
Go to Project Management > Project details,
-
Navigate to the Access Points tab,
-
Click the edit icon (pencil),
-
Rename your access point,
-
Increase or reduce the maximum number of units for the access point, this is the maximum number of bookings that can be made in a single 30-minute time slot,
-
Click save.
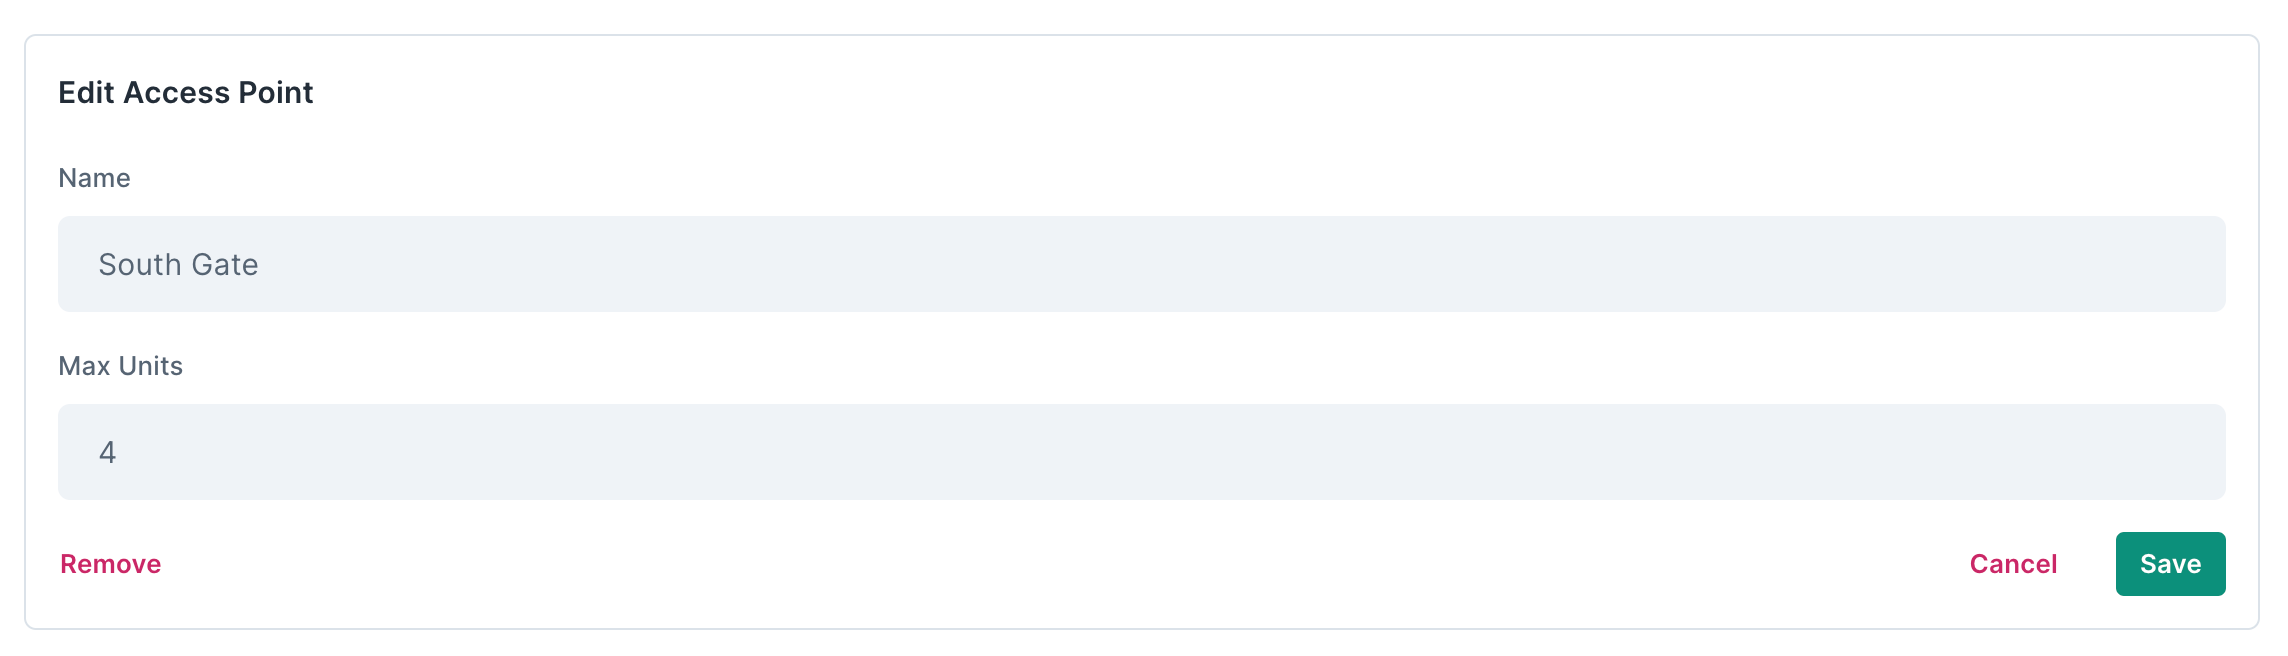
Editing an access point does not affect the existing bookings at the access point. For example, if a fully booked access point has a unit capacity of 5 units and you reduce this to 3 units, the existing bookings will not be affected. All 5 bookings will remain scheduled unless manually canceled.
To remove an access point you must have either the ‘Admin’ or ‘Owner’ project role. Access points can be removed from the Project Details area.
-
Go to Project Management > Project details,
-
Navigate to the Access Points tab,
-
Click the edit icon (pencil),
-
Click remove and confirm,
Removing an access point does not affect the existing bookings at the access point. For example, if an access point with a future booking is removed, the booking will remain scheduled unless manually canceled.
Removing an access point cannot be undone and a new access point added with the same name will have no association with the previous access point, its capacity, or the bookings that were made against it.
To add a resource you must have either the ‘Admin’ or ‘Owner’ project role. Resources can be added from the Project Details area.
-
Go to Project Management > Project Details,
-
Navigate to the Resources tab,
-
Click the plus button in the top left corner,
-
Name your new resource,
-
Select the access points at which you want your newly added resource to be available. For example, a crane resource may only be able to lift from Access Point 1. By selecting only Access Point 1, the crane resource will only be bookable in combination with Access Point 1 (or as part of a resource-only booking),
-
Increase or reduce the maximum number of units, or change to unlimited,
-
Click save.
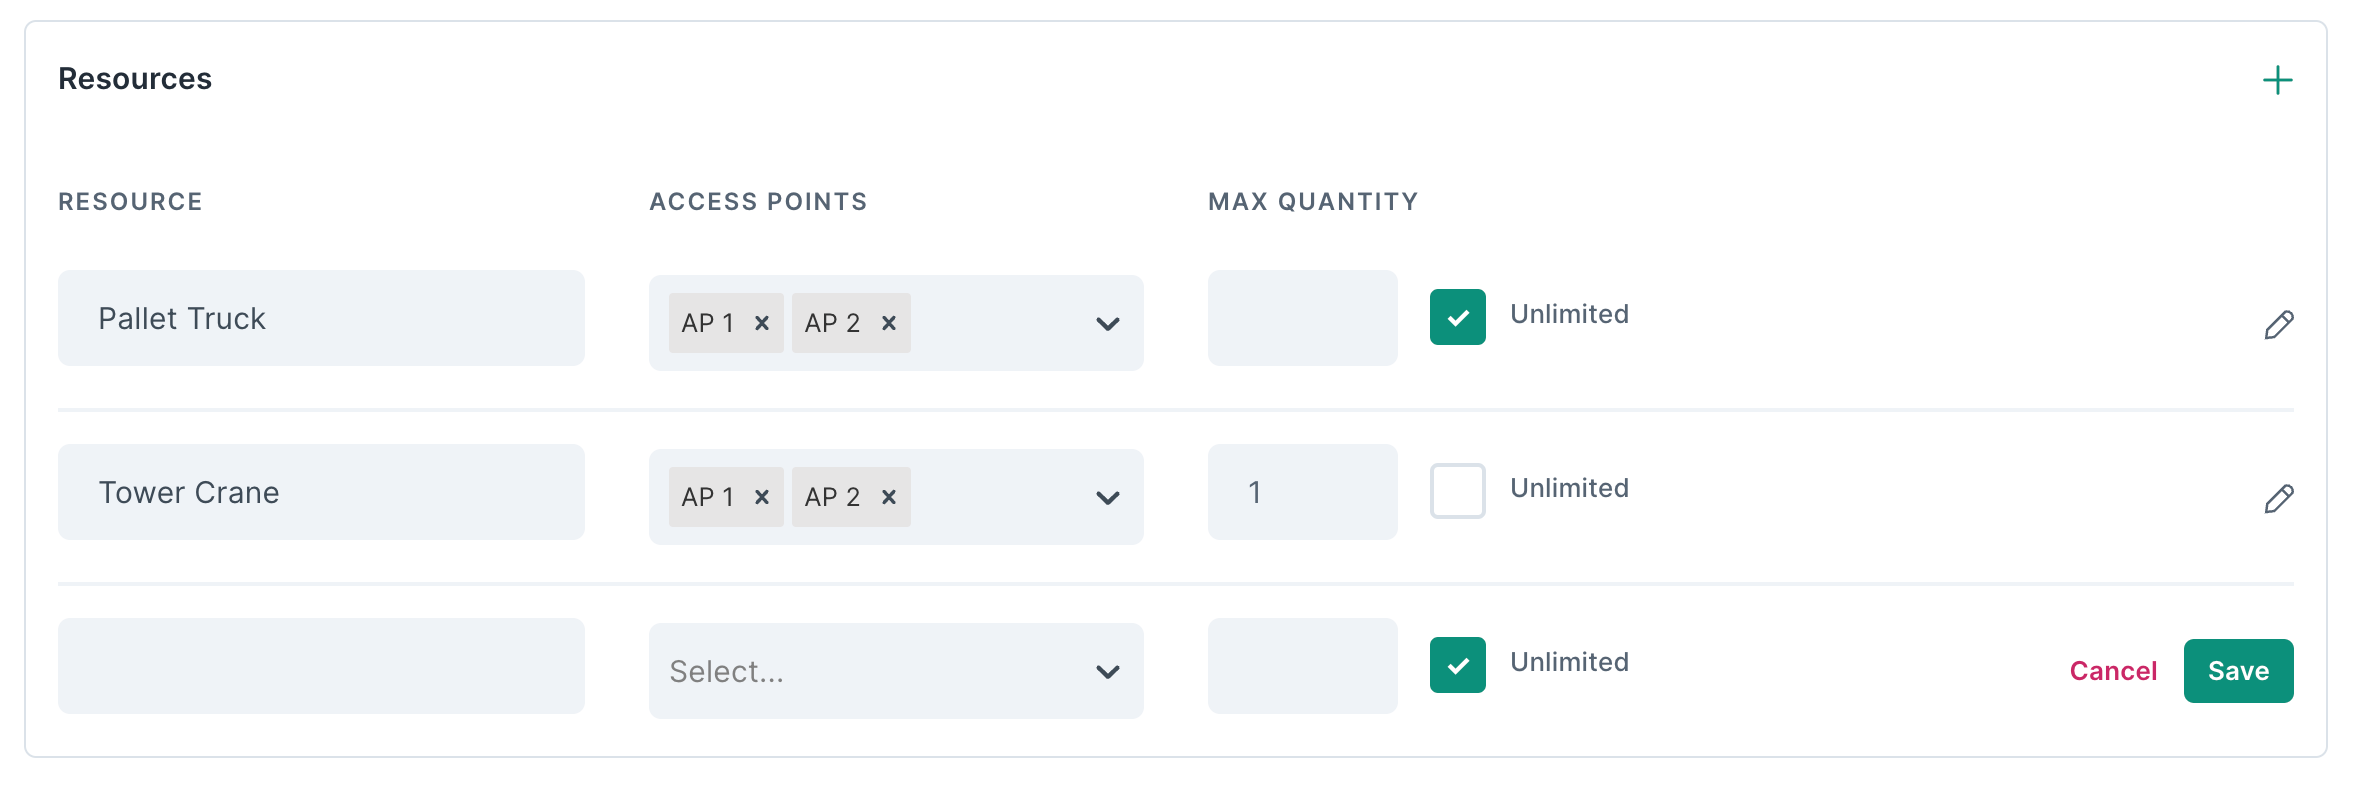
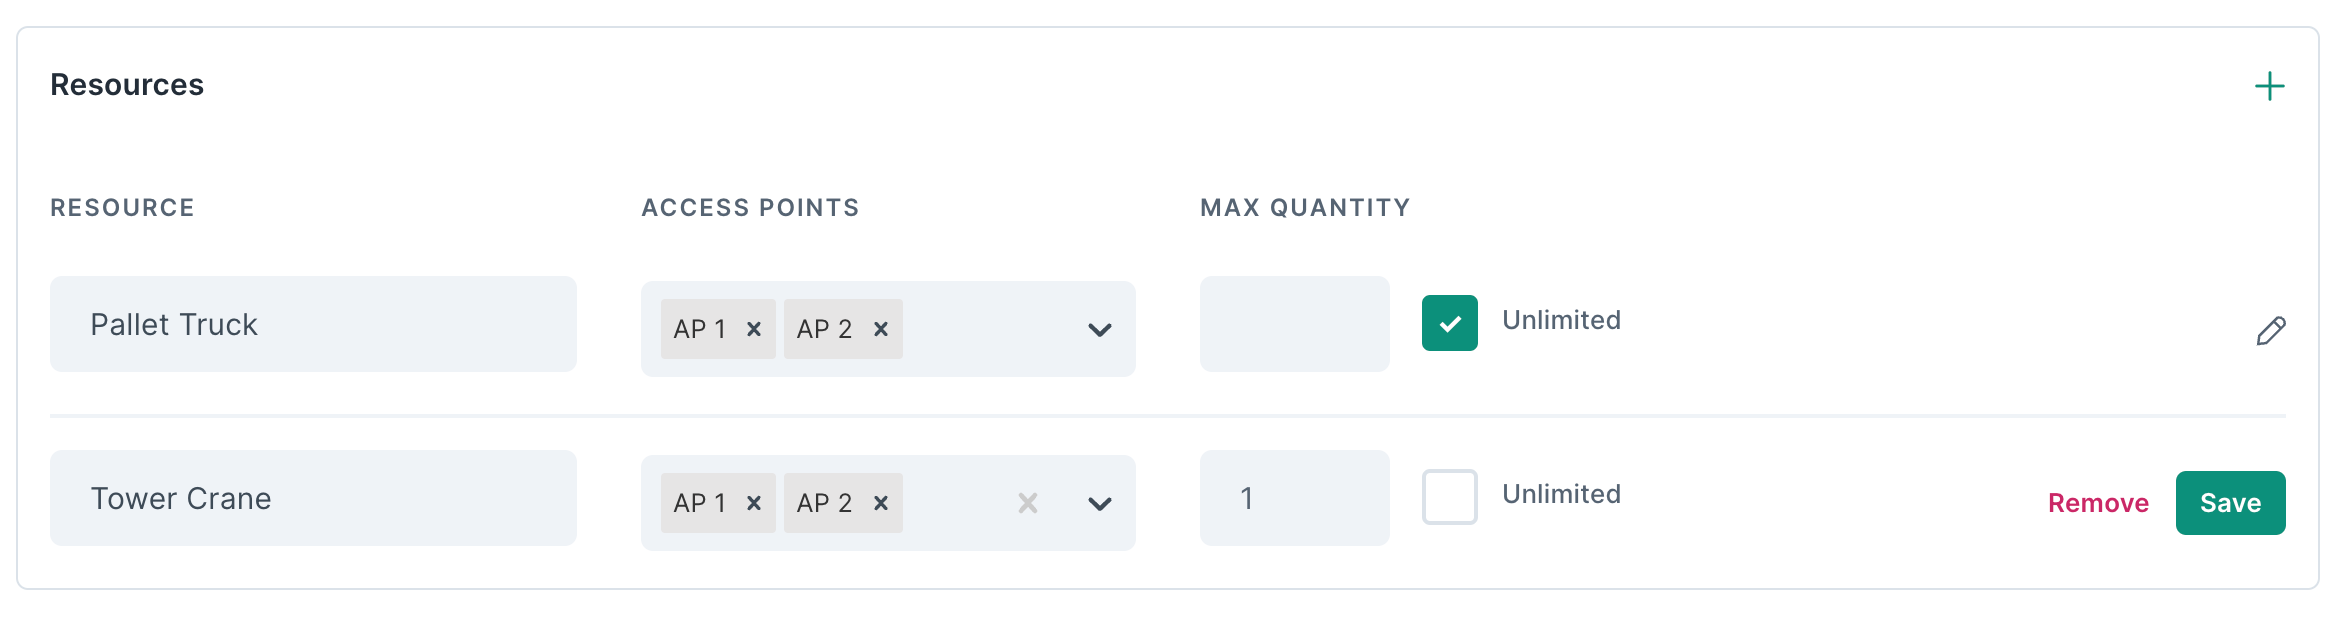
To edit a resource you must have either the ‘Admin’ or ‘Owner’ project role. Resources can be edited from the Project Details area.
-
Go to Project Management > Project details,
-
Navigate to the Resources tab,
-
Click the edit icon (pencil),
-
Rename your resource,
-
Add or remove the access points at which you want your resource to be available,
-
Add a maximum number of units, or select unlimited. This is the maximum number of bookings that can be made in a single 30-minute time slot for this resource. Resource units are separate from access point units. To make a booking at an access point and to use a resource there must be availability at both the access point and the resource,
-
Click save.
Editing a resource does not affect the existing bookings for the resource. For example, if a fully booked resource has a unit capacity of 5 units and you reduce this to 3 units, the existing bookings will not be affected. All 5 bookings will remain scheduled unless manually canceled.
To remove a resource you must have either the ‘Admin’ or ‘Owner’ project role. Resources can be removed from the Project Details area.
-
Go to Project Management > Project details,
-
Navigate to the Resources tab,
-
Click the edit icon (pencil),
-
Click remove and confirm,
Removing a resource does not affect the existing bookings for the resource. For example, if a resource with a future booking is removed, the booking will remain scheduled unless manually canceled.
Removing a resource cannot be undone and a new resource added with the same name will have no association with the previous resource, its capacity, or the bookings that were made against it.
To update the hours of operation you must have either the ‘Admin’ or ‘Owner’ project role. The site's hours of operation can be updated from the availability area.
-
Go to Project Management > Availability,
-
Navigate to the site tab,
-
Toggle the days of the week switches to set which days of the week bookings can be made,
-
For each day select an opening and closing time for the site or select all day to make the site open 24 hours,
-
Scroll to the bottom of the page and click save.
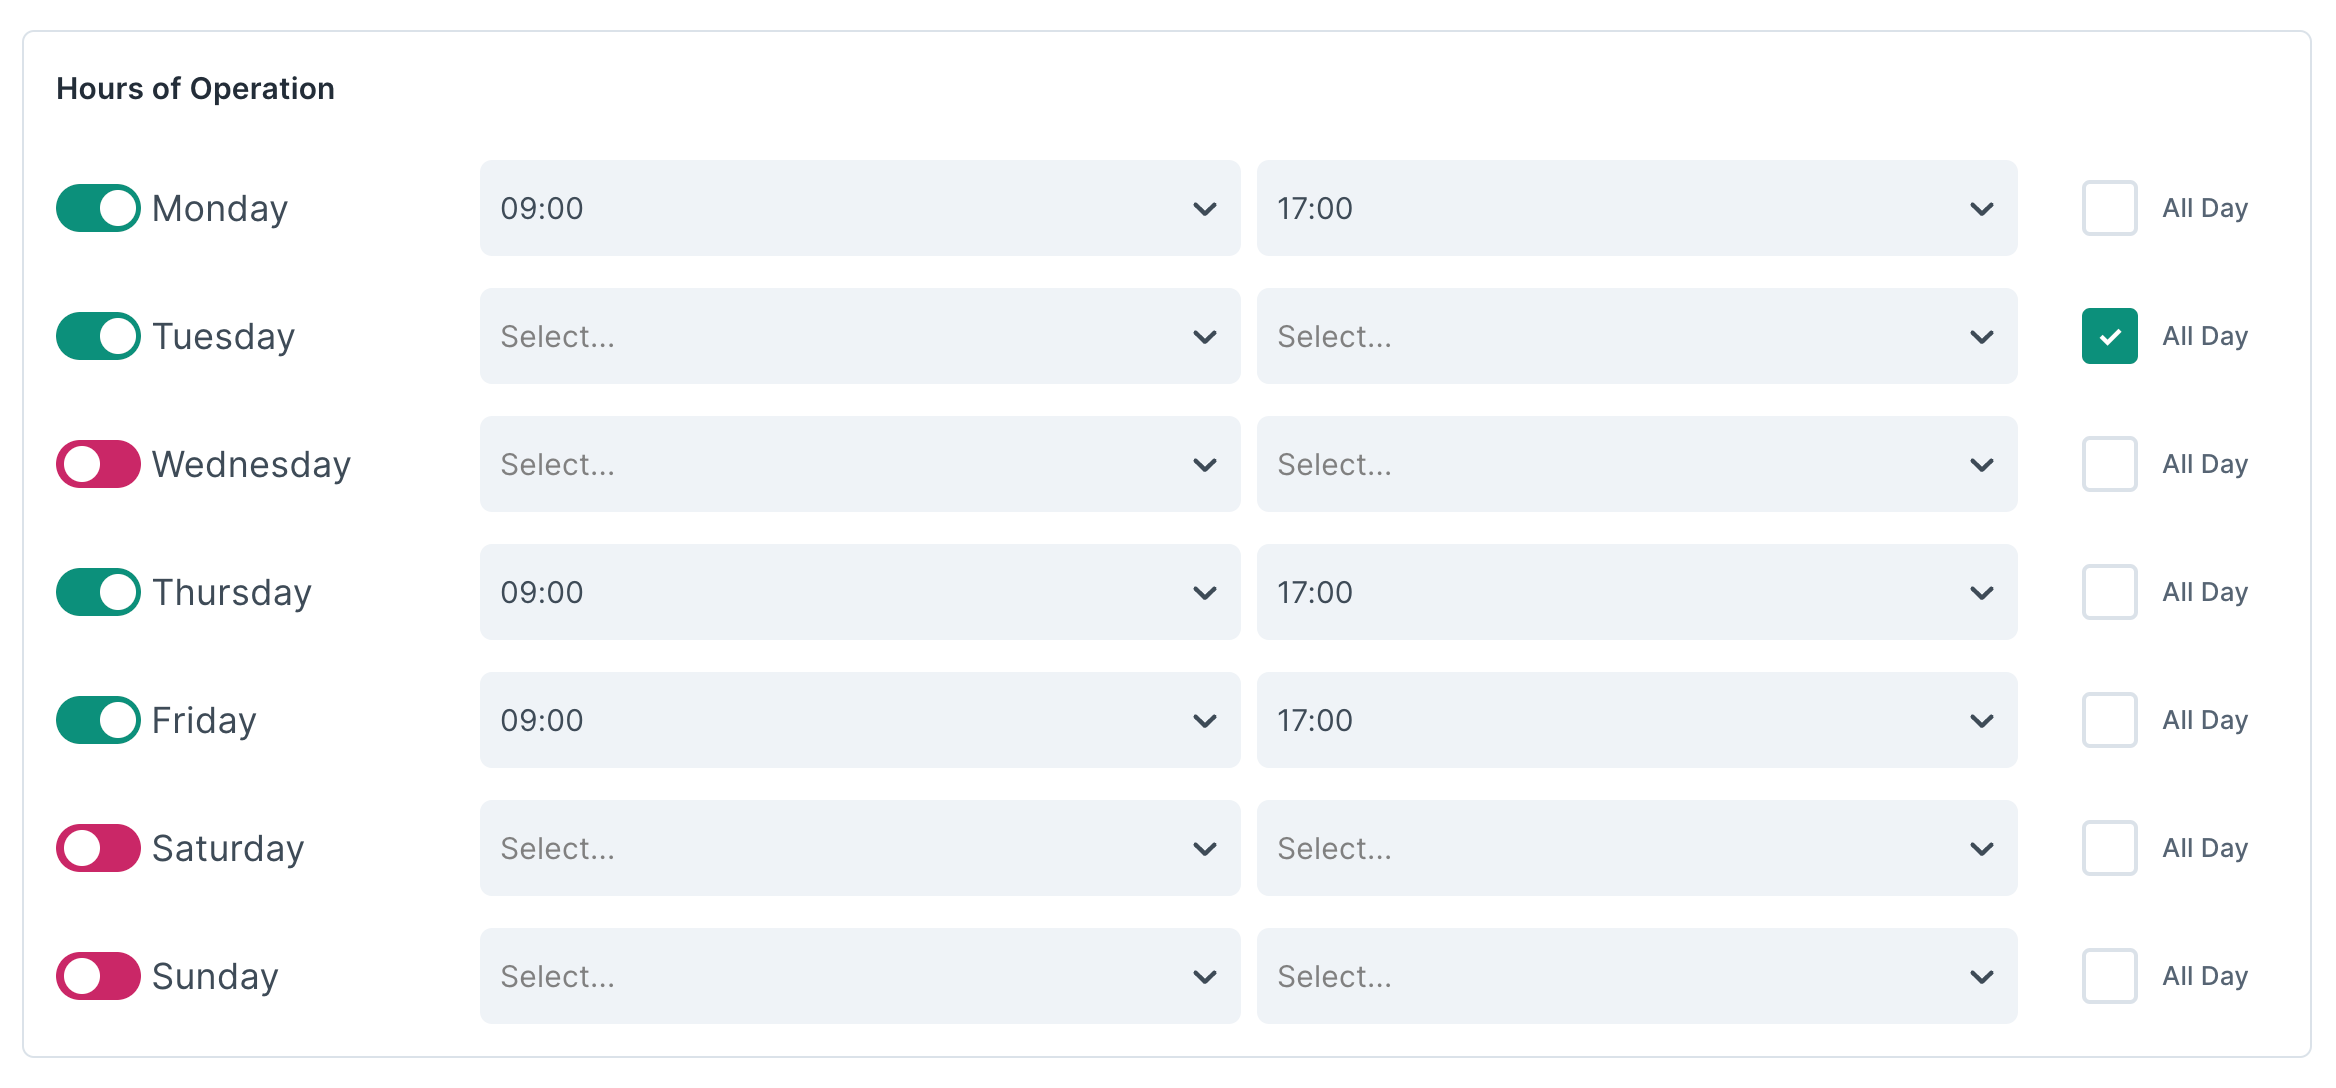
Updating the days or hours of operation at the site does not affect existing bookings. For example, if you choose to close a particular day or reduce the opening hours, any existing bookings that now fall outside the site's updated hours of operation will remain scheduled unless manually canceled.
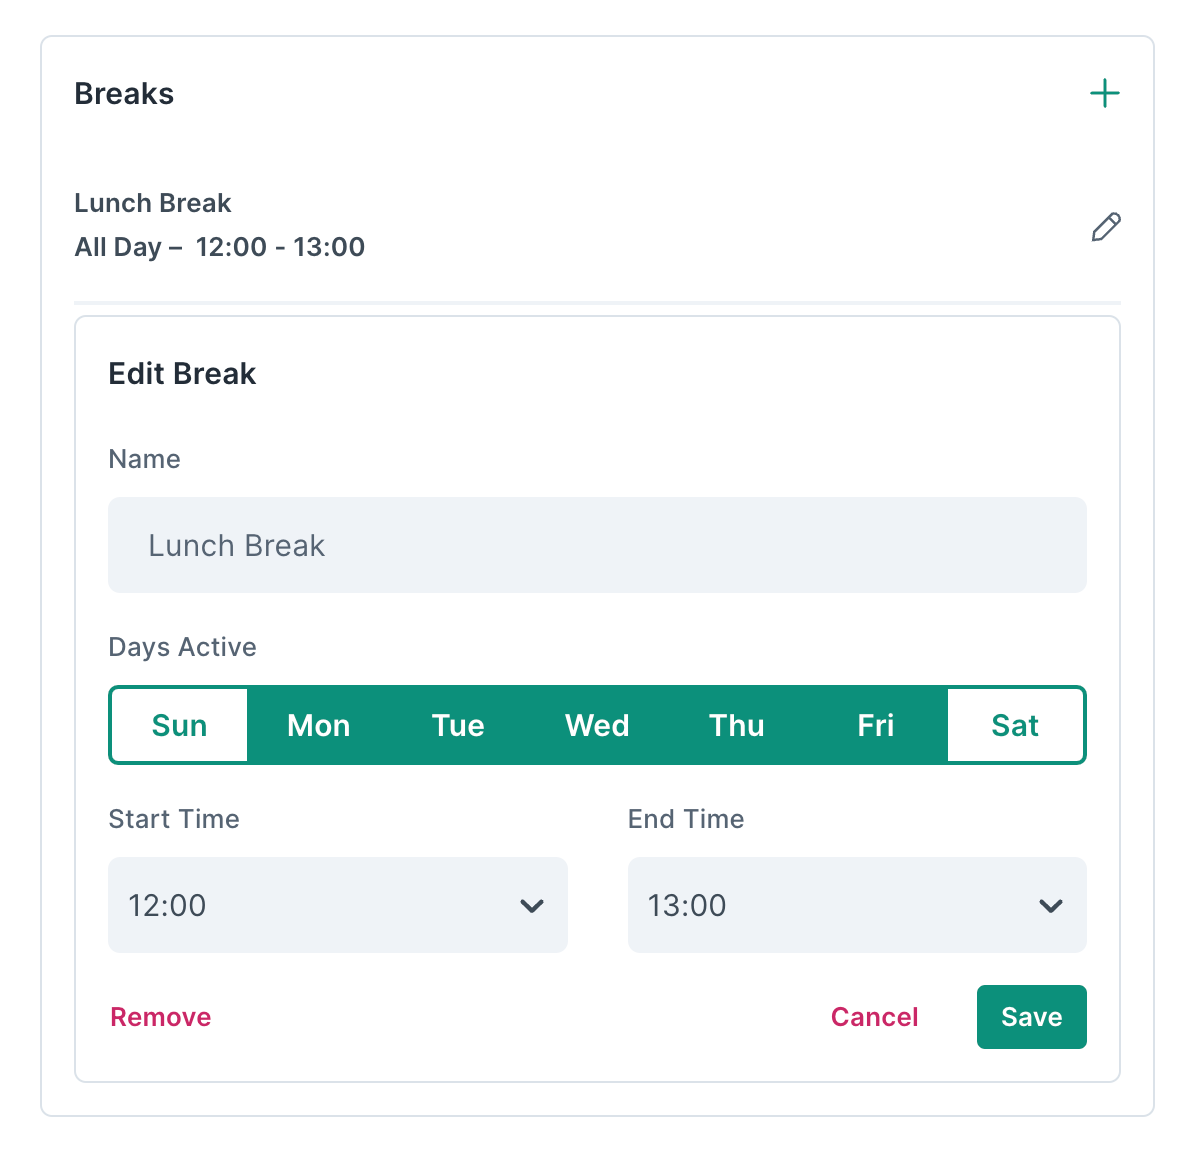
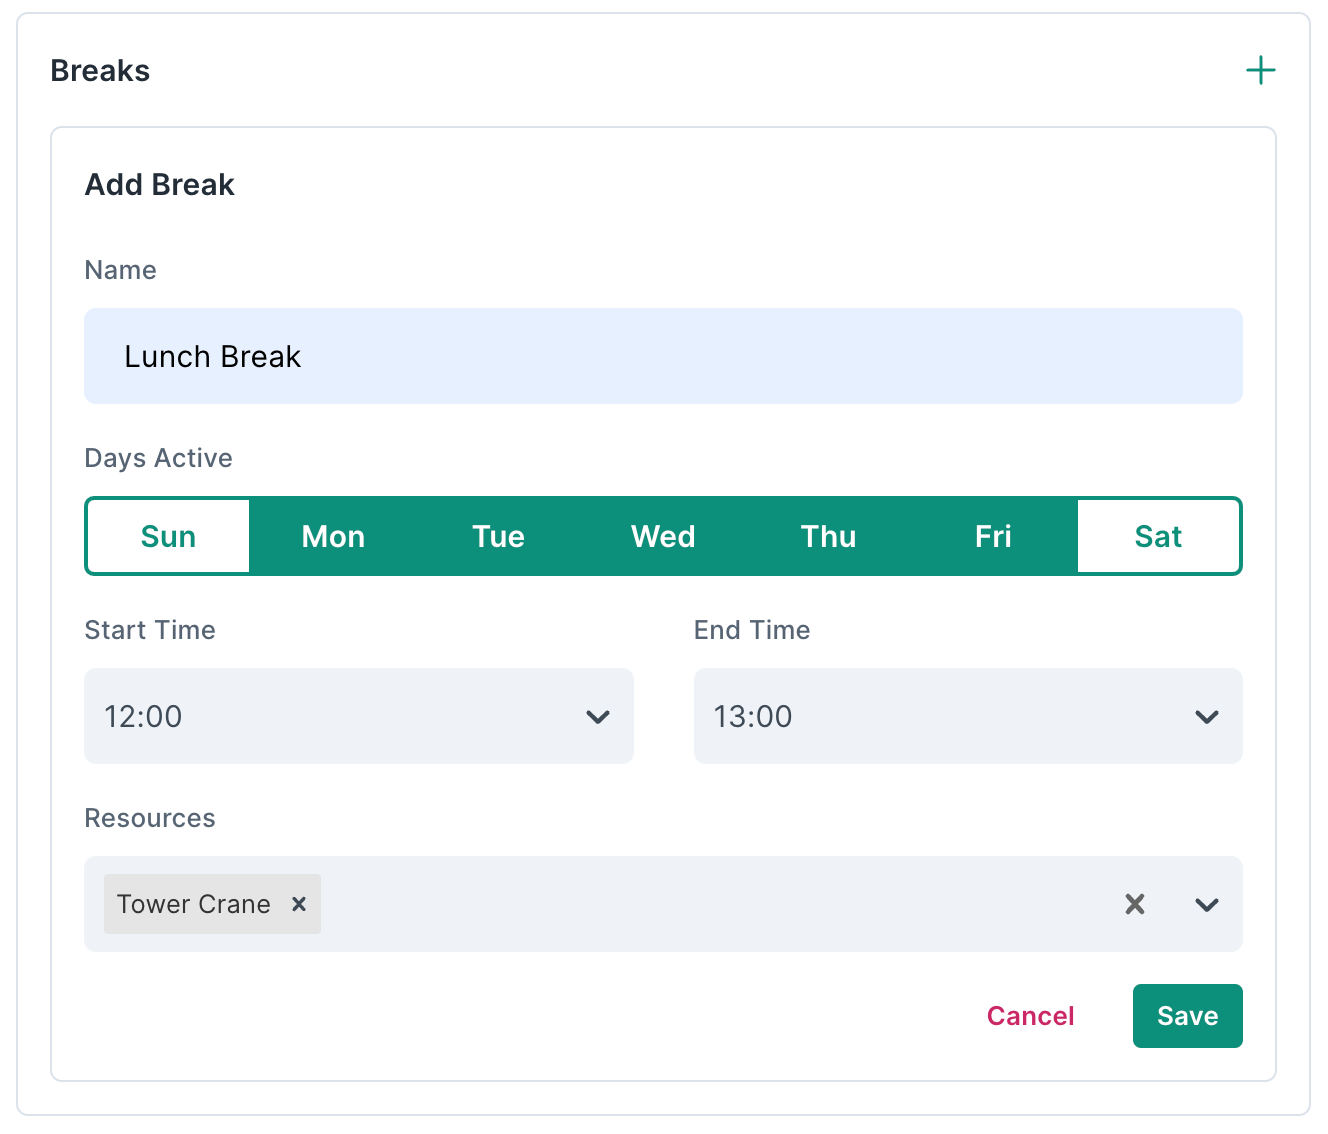
Site Breaks are periods of time during the hours of operation where bookings are restricted. Site breaks apply to access points only. Resource breaks can be added in the resource availability section. To add a site break you must have either the ‘Admin’ or ‘Owner’ project role. Site breaks can be added from the availability area.
-
Go to Project Management > Availability,
-
Scroll to the breaks section,
-
Click the plus icon to create a new break,
-
Add a name for the break,
-
Select the days of the week the break should apply,
-
Select the start and end time of the break,
-
Click save.

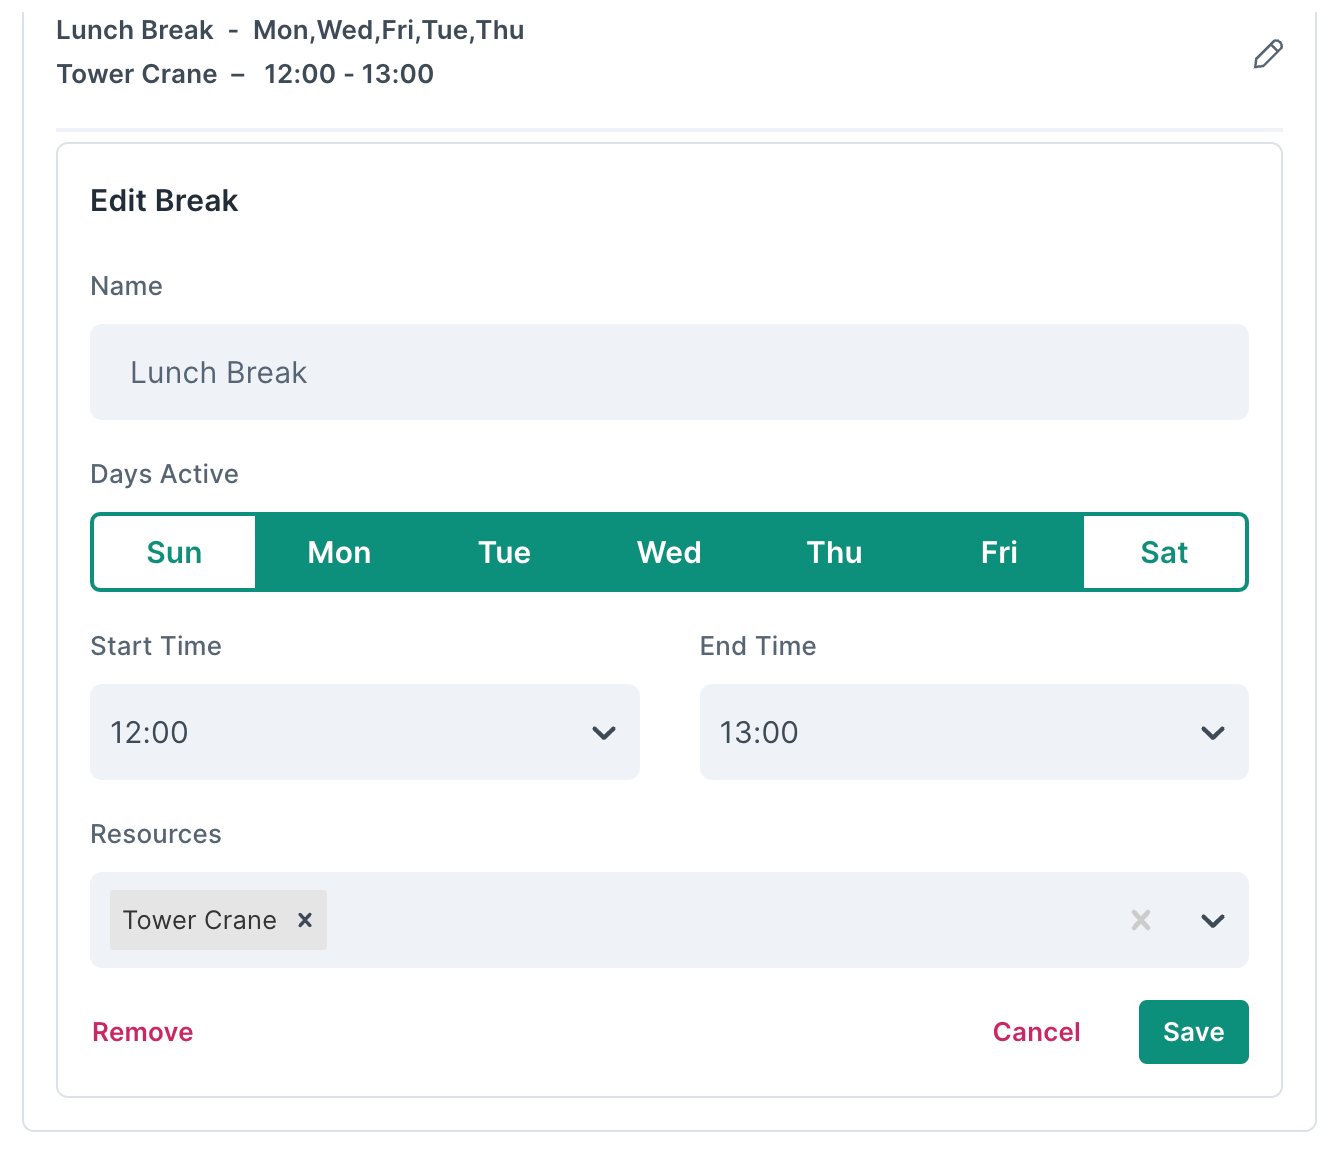
To edit or remove a site break you must have either the ‘Admin’ or ‘Owner’ project role. Site breaks can be edited or removed from the availability area.
-
Go to Project Management > Availability,
-
Scroll to the breaks section,
-
Click the edit icon (pencil) on the break you wish to edit,
-
Update the name for the break,
-
Update days of the week the break should apply,
-
Update the start and end times of the break,
-
Click save.
or
-
Click remove and confirm the removal to remove the break altogether.
Editing or removing a site break does not affect existing bookings. Any bookings that do not align with the new site breaks will remain scheduled unless manually canceled. Removing a site break cannot be undone.
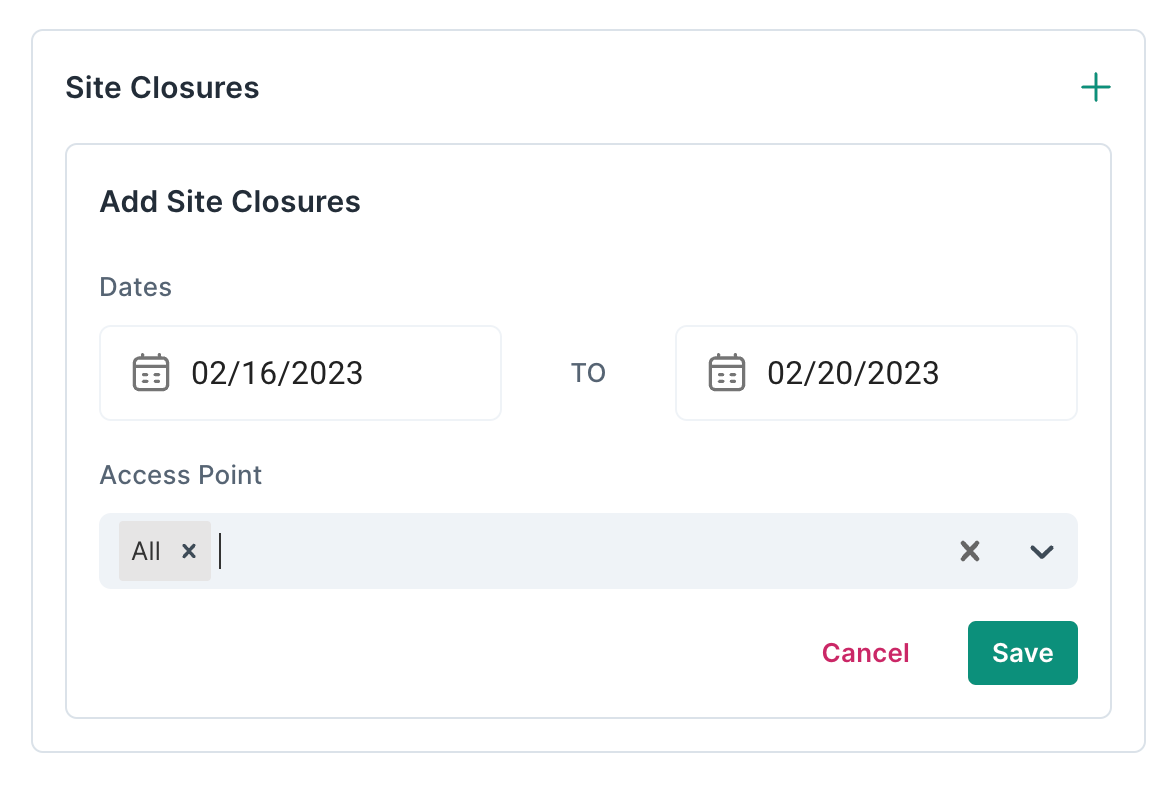
Site Closures are periods of time where the site is considered closed and bookings are restricted. Site closures can be applied to 1 or more access points. Resource closures can be added in the resource availability section. To add a site closure you must have either the ‘Admin’ or ‘Owner’ project role. Site closures can be added from the availability area.
-
Go to Project Management > Availability,
-
Scroll to the site closures section,
-
Click the plus icon to create a new closure,
-
Select the start date and end date for the site closure, if it is a single-day closure select the same date for both the start and end date,
-
Select the access points the closure should apply to,
-
Click save.
The advance booking settings area is where you can set the constraints on how far in advance and how near to the current time to allow bookings.
'Days allowed in advance' defines the period between the current date and a set number of days in the future when bookings can be made. For example, if today's date is the 1st of January and the number of days allowed in advance was set to 30, the furthest date in the future for which you could make a booking would be the 30th of January. The ‘Days allowed in advance’ is a rolling period, therefore it is always the set number of days from the current date.
‘Hours restricted before delivery’ defines a period between the current time and a set number of hours in the future when making a booking is restricted. For example, if the current time is 9:00 am and the 'Hours restricted before delivery' is set to 12, the earliest time you could make a booking is 9:00 pm. The Hours restricted before delivery' is a rolling period, therefore it is always the set number of hours from the current time.
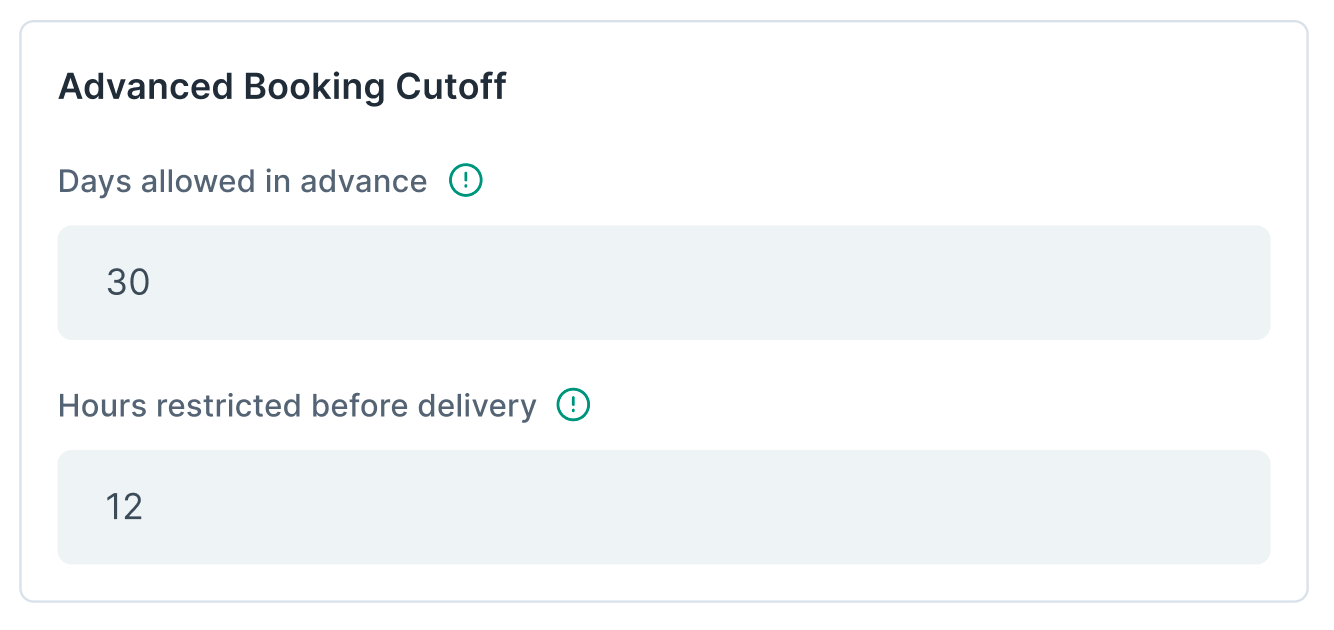
To update the advanced booking cut-off settings you must have either the ‘Admin’ or ‘Owner’ project role.
-
Go to Project Management > Availability,
-
Scroll to the advanced booking cut-off section,
-
Update the ‘Days allowed in advance’ value,
-
Update the 'Hours restricted before delivery' value,
-
Click save at the bottom of the page.
To update the resource operating hours you must have either the ‘Admin’ or ‘Owner’ project role. A resource's operating hours can be updated from the availability area.
-
Go to Project Management > Availability,
-
Navigate to the resources tab,
-
Toggle the resource switches to set a resource to be active or inactive,
-
For each resource select an opening and closing time for the site, or select all day to make the site open 24 hours,
-
Scroll to the bottom of the page and click save.

Updating the days or hours of operation at the site does not affect existing bookings. For example, if you choose to close a particular day or reduce the opening hours, any existing bookings that now fall outside the site's updated hours of operation will remain scheduled unless manually canceled.
To add a resource break you must have either the ‘Admin’ or ‘Owner’ project role. Resource breaks can be added from the availability area.
-
Go to Project Management > Availability,
-
Scroll to the breaks section,
-
Click the add icon (plus) in the top right,
-
Add a name for the break,
-
Set days of the week the break should apply,
-
Set the start and end times of the break,
-
Set the resource the break should apply to,
-
Click save.
or
-
Click remove and confirm the removal to remove the break altogether.
Editing or removing a resource break does not affect existing bookings. Any bookings that do not align with the new resource breaks will remain scheduled unless manually canceled. Removing a resource break cannot be undone.
To edit or remove a resource break you must have either the ‘Admin’ or ‘Owner’ project role. Resource breaks can be edited or removed from the availability area.
-
Go to Project Management > Availability,
-
Scroll to the breaks section,
-
Click the edit icon (pencil) on the break you wish to edit,
-
Update the name for the break,
-
Update days of the week the break should apply,
-
Update the start and end times of the break,
-
Update the resource the break should apply to,
-
Click save.
or
-
Click remove and confirm the removal to remove the break altogether.
Editing or removing a resource break does not affect existing bookings. Any bookings that do not align with the new resource breaks will remain scheduled unless manually canceled. Removing a resource break cannot be undone.
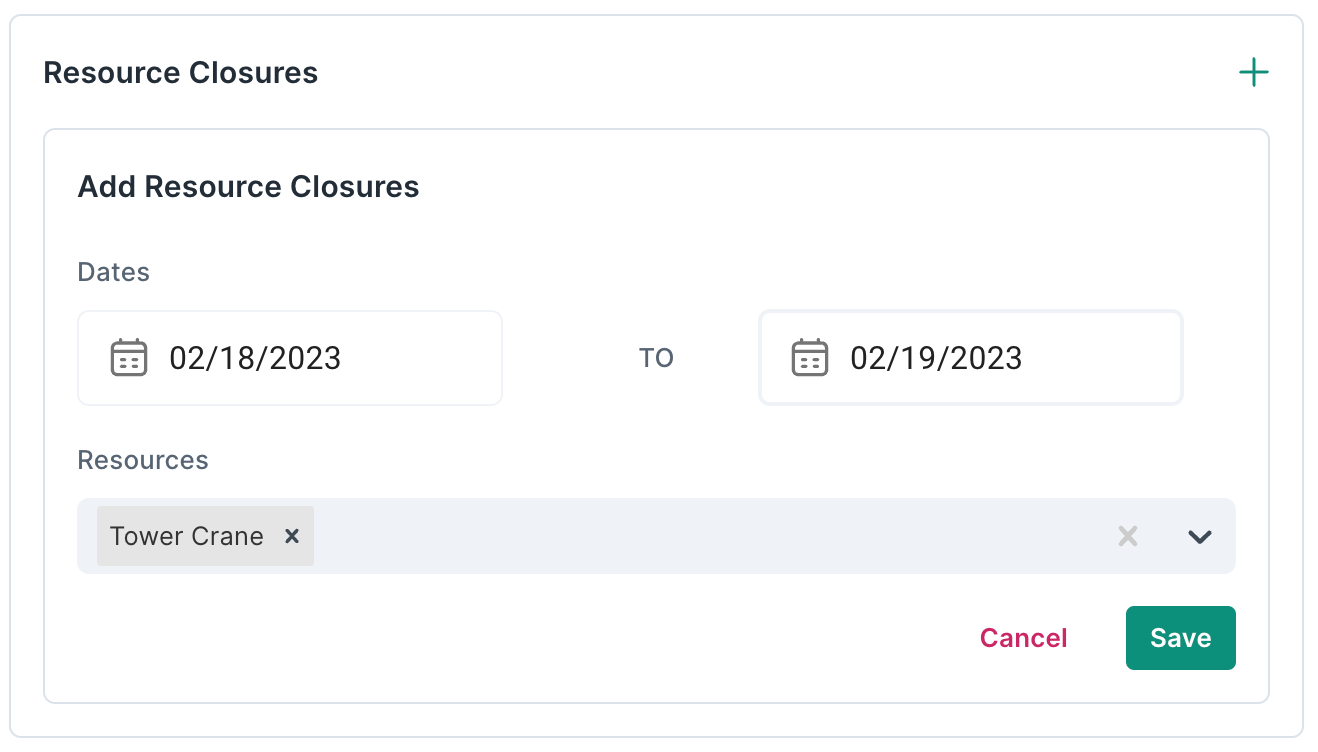
Resource closures are periods of time where the resource is considered closed and bookings are restricted. Resource closures can be applied to 1 or more resources. Resource closures can be added in the resource availability section. To add a resource closure you must have either the ‘Admin’ or ‘Owner’ project role. Resource closures can be added from the availability area.
-
Go to Project Management > Availability,
-
Scroll to the resource closures section,
-
Click the plus icon to create a new closure,
-
Select the start date and end date for the resource closure, if it is a single-day closure select the same date for both the start and end date,
-
Select the resources the closure should apply to,
-
Click save.
If you would like to update fields in the booking creation process or add new fields to capture additional data, you must contact your Voyage Control Account Manager. They will be able to reconfigure the booking creation form for your requirements.
If you would like to change the required state of fields in the booking creation process or remove a field completely, you must contact your Voyage Control Account Manager. They will be able to reconfigure the booking creation form for your requirements.
The hours of operation, breaks, closures, and advanced booking cut-off settings can be updated in Project Management > Availability. To be able to access this area and update the availability criteria for the project site you must have the project role; ‘Admin’ or ‘Owner’.
Access points and resources can be added in Project Management > Project Details and by selecting the Access Points or Resources tab. To be able to access this area and add new access points and resources you must have the project role; ‘Admin’ or ‘Owner’.
Booking limits for access points and resources can be set from Project Management > Project Details area and selecting the Access Points or Resources tab. After clicking edit on the desired access point or resource you can update the max units value. This is the maximum number of bookings that can be booked in the same time slot. To be able to access this area and update the unit capacities you must have the project role; ‘Admin’ or ‘Owner’.
You can invite users to join your project from the User Management area. To invite a new user, all you need is their company email address. Enter the email addresses of all the users you want to invite and assign them a user role. To be able to access this area and invite new users you must have the project role; ‘Manager’, ‘Admin’, or ‘Owner’.
Only projects you are associated with will appear in your project list. To be associated with a project, you must be invited by the project team. If you don't see the project in your project list you may not yet have been invited or you may have been removed from the project. If you believe you should have access, please contact the project team to request an invite.
An invitation to join a project on Voyage Control expires after 7 days. If your invite is expired, please contact the project team to request a new invite.
Your booking was declined by someone on the project team. This may be because the project site can no longer facilitate a delivery at your selected date and time. You can reschedule your booking from the Voyage Control platform. Locate your booking, open the booking details, and select ‘Reschedule’.
Your booking was refused by someone on the project team. This may be because there was an issue at the project site or the information, time slot, or date of the booking was not correct. The project site teams are responsible for managing this process, please contact the project team if you need more information about this action.
Your booking was canceled either by someone on the project team or someone with admin permissions within your organization. This may be because the project site can no longer facilitate a delivery at your selected date and time. You can see who canceled our booking by locating the booking on the platform, opening the booking details, and navigating to the activity tab.
There are many reasons why your account may appear restricted or blocked. To regain access to your account, please contact support@voyagecontrol.com so that we can resolve the issue.
Only users with the organization role ‘Admin’ can update their organization's information. You can see those users in your organization with the admin role in the My Organization area and navigation to the users' tab.
You can update your notification preferences from the notification area accessible from the user menu in the top right of the platform. Notification preferences can be set for each project you are associated with.
The slots presented to you in the booking process are all available slots based on your selected scheduling criteria. If the slot you want is not available to select, it may be outside the project sites operating hours or there may already be the maximum number of bookings for that slot.
The maximum and minimum durations are set by the project team. It is not possible to book a longer duration than the maximum duration highlighted in the booking process.
If you have forgotten your password, you can reset it. To reset your password you need to go to the login page and select 'forgot password'. After entering your email address you will be sent an email with password reset instructions. The password reset email may take up to 10 minutes to arrive in your inbox and may sometimes end up in your junk or spam folder.