Training Guide for Site Managers
This page is a reference page for admin site users at a General Contractor that have been trained by a Voyage Control Account Manager. Several common tasks that may need to be done are outlined below as well as a list of tasks that an Account Manager will need to be contacted to do.
For any additional support requests, these should be filtered through Jira Service Management. To learn how to submit a new ticket or review existing requests, please follow this guide. If you do not have access to JSM, please contact your account manager.
Signing up new users and giving them permissions
Step 1: Create an Account
To add new users to the platform, they will need to create an account.
To view our ‘Voyage Control - Create an Account’ video, please click here.
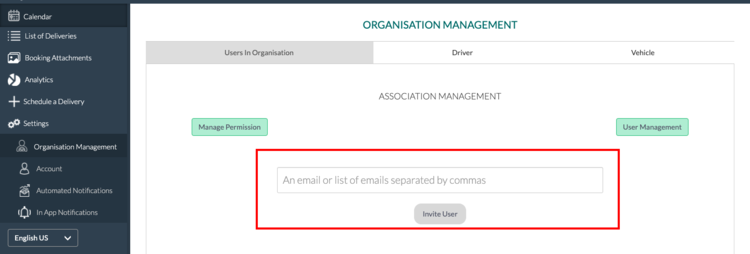
To invite/associate users to your company:
Click on Settings, then go to Organisational Management. Click Associate User on the right-hand side. You will then be able to invite users to sign up to Voyage Control under your company name by entering their email. The new user will receive an email to click on and will be able to sign up to the platform. This helps to group users under the same organisation, and (depending on permissions) can allow teams to see each other’s bookings.
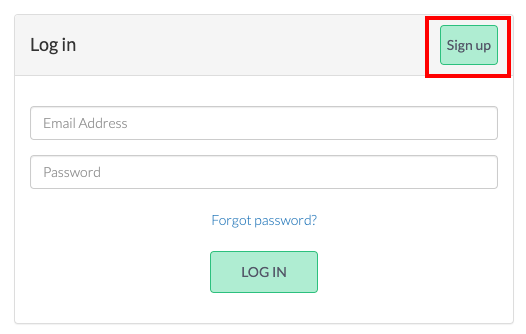
To sign up a new user:
To do this, you or they will need to open up your website on their computer or iPad (we suggest bookmarking it for them for future reference). If they do not have either an iPad or laptop, you can use yours and either open a private browsing window (by pressing ctrl+shift+N) or logging out of your instance of Voyage Control by clicking the white circle in the top right corner of the platform that looks like a power button. If they already have made an account, you can skip to the next step. Each new account will be given the default access. If you want to give greater access to an already existing account, go to Step 2.
Click on the Sign Up button on the login page and fill in the details. Once you accept the terms and conditions and click register, a verification email will be sent to the inbox associated with the account. Make sure to check the junk folder if you do not receive your verification email, or get in contact with your Account Manager. To verify your account, click on the link in your email and enter in the company name.
.png)
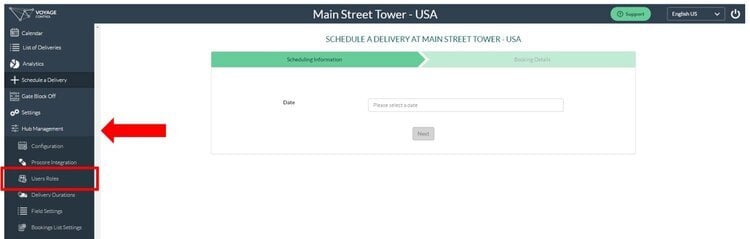
Step 2: Navigate to User Roles
Go to the User Roles page on your site. You’ll find this section located under the Site Management panel on the left blue bar. If you don’t see this option, please contact your Voyage Control Account Manager for help with access.
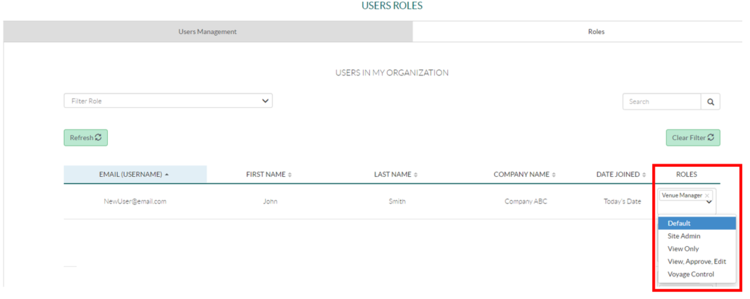
Step 3: Assign a User Role
Find the user and give them access. If you want them to be able to see all bookings at the site, then give them the ‘View Only’’ permission as well. Other permissions such as ‘View, Approve, Edit’ give even more access to end users if necessary.
If you have different options for roles listed and it is unclear as to which permissions you should assign to new users, please contact your Voyage Control Account Manager.
Step 4: Download the Mobile App
You can find the mobile app in the Apple App Store or the Google Play Store. Once you have downloaded the app on the subcontractor’s phone, they can log in with their credentials that they used to sign up for the website. Once logged in, they should see your site as the available site to book their delivery to and then can schedule their delivery as well as see the list of the day’s deliveries. For a more instructions on the app capability, please reach out to your Voyage Control Account Manager.
Adjusting Available Locations
If you need to adjust which Loading Docks/Gates/Access Points are available, you’ll need to use the Access Point tool in Hub Management. If you don’t see this section, please contact your Account Manager to enable it for you.
.png)
This section will allow you to add new access points, edit existing access points, and make access points active or inactive from within the platform. To make a new access point, click +Add Area, then fill in the fields for that specific access point. To edit an access point, simply click the pencil button to the right of the access point. This will allow you to edit the name (which will make changes to all previous bookings as well), as well as make areas inactive - this will mean that people are no longer able to make bookings into those areas, but not cancel future bookings into that area. You will see similar fields as the example below:
.png)
Adjusting Available Times
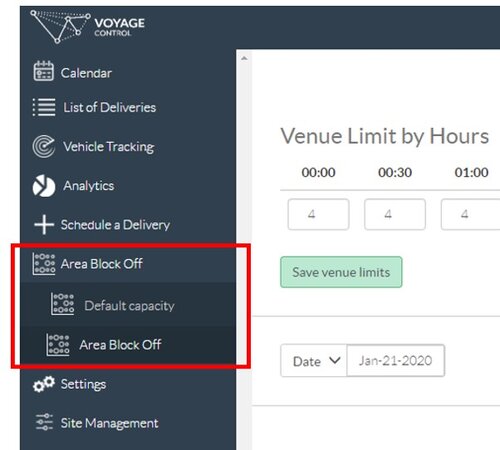
If you need to adjust what hours that Loading Docks / Gates are available, then you need to use the Area Block Off tool in the left blue bar. There are two sections that appear here: Default Capacity, and Area Block Off. Terminology may vary slightly by sites here (e.g. Daily Access Points instead of Area Block Off). The Default Capacity section sets the capacities which apply to all days by default, while the Area Block Off/Daily Access Points section allows you to set individual day’s capacities. In both sections, an excel (.xlsx) file can be uploaded that will have a grid of the areas and times which you can manipulate in excel and then upload.
In the daily adjustments, you can manually click in to specific time slots as well. This is useful if you only have a couple of times to adjust. The daily option also presents the opportunity to close an area by clicking on the green circle next to the area name which will turn red and prevent any future deliveries from being scheduled that day. If you need to cancel all deliveries for a day in a specific area, please reach out to your Account Manager.
Your Account Manager should provide you with the csv file that you’ll need for these features during your implementation. If you need a template file, you can download the below one and edit the first column to have the naming convention of your different areas. If you have any issues uploading the file or need additional help, please contact your Account Manager.
Flexible Forms
Flexible forms are located in the Site Management section of the platform and are typically used to capture information at the end of the delivery scheduling process right before where a user would click submit. Examples of these questions are typically things such as destination floor or quantity information for the material that is being delivered.
If you need to add floors or other options to the drop down, you can click in to the individual form and add them from there. Once you add the floors, you need to scroll down and click the save button at the bottom.
If your sites uses additional functionality, such as Rules that trigger emails based on form answer, then please contact your Account Manager for help with configuring these or making changes.


Adding Delivery Dates
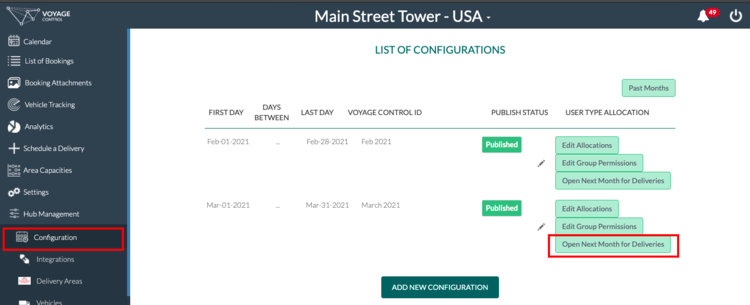
To open up future dates for deliveries, you can build the Monthly Configurations in the platform. To do this, go to the Site Management section and click the Delivery Dates section.
The process of creating a new monthly configuration is to copy the setup of the current one by clicking Duplicate Active Event and updating the naming convention of the Name* indicating the month you would like to create. The configuration information will copy over exactly the same, but you will need to update the date range and available access points in the tabs “Weeks”, and “Access Points” . For the Weeks section, just select the date range you want from the first of the month through the last day of the month. For the Access Points tab, just click the Select All button for all the days.
You can also copy over the information from a previous month by clicking the Past Configurations button, selecting the past month you want to copy over, then clicking Copy Configuration. This will create an exact copy of a previous month that you can then adjust as necessary.
For a detailed guide on how to create the configurations from scratch, click on the button below.
Adding Vehicles
To add vehicles to the booking drop down, go to the vehicle management tab in Hub Management. From here you can edit current vehicles and add new ones.
.png)
To add a new vehicle, click the button +Add Venue Vehicle and fill in the relevant fields. The Vehicle Name is the name that users will be asked to select in the booking process. The Units are the amount of an access point’s capacity that vehicle will take up. The Load Time is the default booking duration selected when users are asked to select their times and the Vehicle Type allows us to capture what kinds of vehicles are coming in to adjust our environmental settings. Then click the tick box Visibility to make this vehicle active, then Save and the new vehicle will be added to the booking process.
If you have any questions on this process, please contact your Voyage Control Champion or your Account Manager

Adding Resources
To add a new Resource using our ‘Resource’ tool.
- Go to Hub Management > Resources
- To add a new resource click + Add Resource
- To edit a resource click on the pencil icon, and then edit the text in the textbox
- To delete a resource, click on the trash can icon
- Default Allocations determines the usual capacities of the resources indefinitely. Using the template below you can adjust these capacities.
- Resource Allocation allows you to set up a custom capacities per day. Using the template below you can adjust these capacities.
Adding Site Contacts
To add site contacts, go to the button labelled Site Contacts or Tenants in Hub Management. To add a new site contact click +Tenants and add in their details.
Multiple Check-ins
Multiple Check-Ins feature enables multiple vehicles associated with the same operation to be scheduled at once.
Concrete Operations & Muckaway Operations
- Schedule all of the concrete/muckaway trucks associated with a delivery in one booking
- Track Quantities
- Store photos and documents with each individual vehicle
This can be used for other repetitive deliveries such as dumpster servicing, portable toilet servicing, etc.
To enable multiple check-ins on your site, please contact your Account Manager.
Tasks that Require your Account Manager:
There are a few tasks that you’ll still need to ask your Account Manager to do for you. Turnaround time for these requests is typically within one to two business days. Expectations for this will be set during implementation.
-
Changing the labelling of terms within the platform (e.g. the options on the sidebar, or on the list view)
-
Removing field options from the booking process that aren’t captured via Flexible Forms
Support:
For any additional support requests, these should be filtered through Jira Service Management. To learn how to submit a new ticket or review existing requests, please follow this guide. If you do not have access to JSM, please contact your account manager.